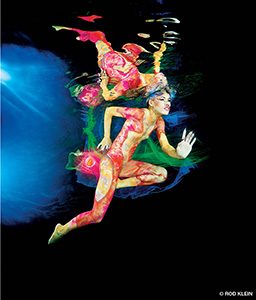
Most underwater photographers start as divers. In my case, I was a photographer long before I began diving. In fact, I went to art school and have a master of fine arts degree in photography. After more than 20 years making images of marine life, I thought it was time for a change. I wanted to do something that would take me back to my early artistic roots but still keep me wet.
My vision was to have a clear, warm and controlled environment where I could push the limits of creativity and still breathe from a scuba tank. The fruition was a custom-designed 11-foot-deep saltwater pool. It has 20 embedded mounts to attach strobe arms so I don’t have to attach strobes on my housing. It can easily be heated to 86°F-90°F, temperatures comfortable to be in even without thermal protection. My pool also has two lower-level viewing windows so observers can watch or shoot video of a project.
Underwater photography in pools has become very popular over the past few years. Since it is not necessary to be a scuba diver to shoot in a pool, many people shoot in shallow pools, holding their breaths and ducking underwater to take photos. Coming from a diving and underwater photography background, I have a different approach. In the course of working in my underwater studio I’ve learned many lessons that might help other photographers in their own pool photo sessions.
Model Orientation and Evaluation
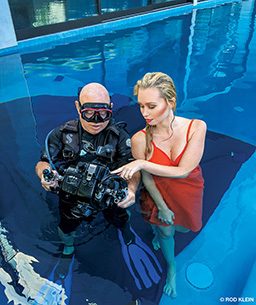
While it isn’t hard to find models who have experience in front of the camera, not all will be comfortable in and under the water. Some are even afraid of the water. You might be surprised that many of the skills you take for granted, such as equalizing your ears, are foreign to those who don’t dive. It is important to get a sense of your model’s abilities and comfort in the water prior to a shoot.
I shoot in both the shallow and deep ends of the pool. The skills required for each are a little different, but even if you shoot only in shallow water it’s important to get a sense of your model’s basic water skills. Even when I work with models who are experienced freedivers, I have an in-water orientation with them before I schedule a shoot, which is necessary both for safety and to determine our compatibility. We also work extensively on buoyancy skills before doing deep-end shoots.
Make things easy the first time around: Shoot in shallow water, as this eliminates the need for safety divers and extra crew. As long as the model can just stand up for air, your shoot will go smoothly.
Be a Model
Before you direct models, you should be aware of what it’s like to be a model: to see underwater without a mask and control your buoyancy without dive gear. That will help you understand what is involved in posing and how long you can hold your breath and still be relaxed.
Lighting
Get your strobes off of the housing. This will give you more control in terms of exposure and creative positioning. With attached strobes, the exposure will change as you move closer or farther away. Exposure can remain more consistent from shot to shot with the lighting distance fixed relative to the model.
Use inexpensive tripods to mount and position your strobes underwater, and hang extra strobes from the poolsides.
Use multiple strobes, often three or more. Fire the remote strobes using slave mode to avoid having to use cables. I use Triggerfish slave sensors, which can be positioned to face the primary light so they will always flash. Ikelite also makes a good remote slave sensor.
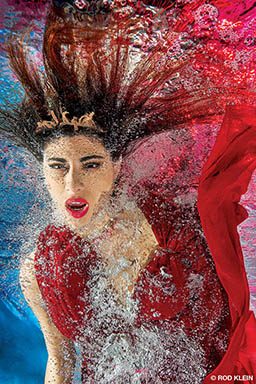
An extra strobe or two is great for creative backlighting. Shooting at night is another option for creating interesting lighting, atmosphere and effects such as surface reflections.
Safety
The safety of everyone involved is crucial. Many shooters who do this kind of photography work only in shallow water so all they or their models have to do to get air is stand up. I shoot in shallow water whenever I work with a model for the first time. When I’m in the deep end or the ocean, there are always at least two assistants: a safety diver to watch the model and provide air through a hookah and another diver to act as my camera assistant and to promote general safety.
The safety diver should keep the regulator close to the model without getting in the frame. I always use a hookah as the model’s air source rather than an “octopus.” No matter how long the hose, it requires the safety diver to come too close to the model to provide air, and they never get out of the frame in time. I zip-tie the second stage of the hookah to a long pole so the diver can hand it to the model and remove it quickly.
Communication and Planning
A good preshoot briefing is essential. I ensure we’re on the same page regarding basic scuba hand signals: OK, not OK, up, down, share air, etc. The “share air” sign is essential because the model will use it to signal the safety diver that he or she needs to breathe from the regulator.
Normally we surface every 5-10 minutes to regroup, talk about the shots, view images on the camera LCD and make any needed adjustments. This is where the photographer needs both great communication skills and great directing skills. You are the only one who knows how the images should look, and it is important to calmly communicate your wishes to your model.
Equipment
You can shoot with just about any camera that can be taken underwater. Most photographers use a housed digital single-lens reflex (DSLR) camera, but you need to be able to fire at least one strobe using either fiber-optic or normal sync cables. Remote strobes can be fired using long cables or preferably in slave mode.
You should have at least two strobes. I have six Sea & Sea YS-250 and six Inon Z-240 strobes. I have a 50-foot custom strobe sync cord that allows me to position my primary underwater strobe anywhere in the pool. If I use a studio strobe for surface lighting, I use a custom cable to fire a studio flash trigger that stays on the surface in a dry box. Using the kind of slave trigger device that would be used in a studio doesn’t work because they are not waterproof. Even if they were housed they could not transmit through the water to a bank of topside strobes on deck, hence the need for a cable to a dry place on deck.
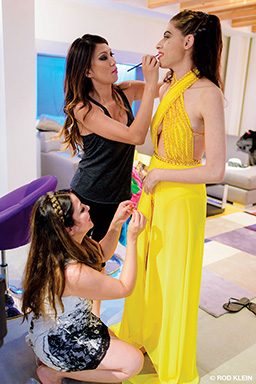
Wardrobe and Makeup
Creative wardrobe can really make a shoot. Often I am lucky and the model will have designers who are eager to get underwater images of their designs. But I have also scoured local fabric stores for colorful pieces to use during experimental shoots. Cheap wigs, masks and toys can also be used as props. I even own several mannequins, which are both great props and good for lighting practice when no model is available. Try draping colored fabric in the pool as a backdrop, as this can add creative interest to the images as well as giving the illusion that you are not in a pool.
I prefer to use a makeup artist whenever I can — it can really add to the look. Some models can do their own makeup, but it’s hard to do touch ups during a shoot since they are always wet.
Workflow
For me a normal pool shoot takes two and a half days: one day to set up, one full day to shoot and about half a day to break down.
Day before shoot (5-6 hours): Set up any required backdrops that will hang in the pool. Set up, check, test and position all underwater and studio lights, batteries, camera and strobe connections. Place backup strobes, weights, tools and anything that might be needed during the shoot at the pool edge so no one has to get out of the water during the shoot.
Day of shoot (6-8 hours): The models, designer, makeup artist and other crew arrive and prepare. If it’s a deep-end shoot, ask the safety diver and camera assistant to arrive an hour early to help with final set up. Confirm waterproof makeup will be used, advise that makeup needs to be extra colorful for underwater work, check wardrobe, check all photo and safety gear, make sure the water temperature is 86°F-90°F, recheck model buoyancy, and add weights as necessary. I often use a small pocket weight belt that can be easily hidden beneath any fabric or have a designer sew a small pocket in the rear of a garment to place a soft weight. Always use soft weights to avoid pool damage.
After shoot (2-3 hours): Break down the set, clean and wash all gear, clean up, download and backup images, and fall into bed.
While a dedicated underwater photo studio is nice to have, it is not necessary for getting great images of models. Start out simple, shoot shallow, use what equipment you have or can borrow and be inspired by other photographers’ work. Just give it a try, and see what happens!
Explore More
| © Alert Diver — Q1 2017 |