MANY DIVERS DON’T WANT TO TAKE LARGE digital single-lens reflex (DSLR) housings or expensive mirrorless cameras on their dives. Their goal is to capture memories to show their family or post on social media, not to get the highest-quality underwater images.
Compact cameras, which are affordable and require minimum experience and effort, can produce stunning results if the user develops additional photography skills. The following is some basic information about compact cameras and how to use them to create better images.
BASICS
Compact cameras usually have either an integrated zoom lens or a fixed-focus lens, both of which are sufficient for underwater use. In general, compact cameras typically have a bigger depth of field due to their smaller sensor size. This feature is good for wide-angle photography but could be challenging if you want to have a blurry background while shooting small subjects such as nudibranchs. Most compact cameras also support shooting 4K videos.
The smaller sensors can perform well in good light conditions but may struggle when the light is weak. A spotting light can help achieve a sharp focus in darker conditions. Shooting fast-moving animals may also be challenging — the autofocus functionality won’t be as sophisticated as that of a full-frame mirrorless camera.
Modern compact cameras have better shutter lag (the time from pressing the shutter until the camera records an image) than they used to, but it is still slower than top-of-the-line cameras. The best workaround is to anticipate the subject’s movement and hold the camera steady after pressing the shutter.
CAMERAS AND HOUSINGS
The compact cameras on the market offer a range of values and prices. It’s a good idea to choose from well-established brands such as Panasonic, Canon, Olympus, Sony, or Nikon. Companies such as Ikelite Underwater Systems have a wide variety of housings customized for each camera model. In the amphibious realm (cameras that can go underwater without a separate housing), SeaLife cameras offer a quality product with a full line of lights and accessory wet lenses.
When using a housed compact camera, pay particular attention to all the O-rings that seal the housing. Keep the O-rings clean, service them often, and ensure no hair or dirt is on them before putting them back into place. Sparingly lubricate them before installing them into the groove. The lubricants are often specific to the type of rubber used to make the O-ring. Using the wrong brand can make the O-ring swell and not seat properly, so make sure you have the kind compatible with your housing.
Occasionally clean the inside of the housing, especially the front port, with a microfiber towel. Compact cameras may generate heat, and the housings are usually form-fitting, so the air inside may be much warmer than the seawater outside, causing the housing to fog. A desiccant pack can absorb moisture and eliminate this issue. Most housings are waterproof to 132 feet (40 meters), which is adequate for recreational diving.
Amphibious cameras are completely sealed from water intrusion but can have varied depth limits and system accessories. The DJI Osmo Action 3, for example, is rated to 52 feet (16 meters), so you can use it on shallow reefs, but it is better suited to snorkeling. The SeaLife Micro 3.0 is an all-in-one solution with a 200-foot (60-meter) depth capability. It is specifically designed for underwater use, so it has specific underwater modes to account for the variable color absorption at different depths.
WET LENSES
Housed cameras typically have interchangeable ports that can accommodate wide-angle or macro lenses. Amphibious cameras (as well as some housings) accomplish the same optic choices through wet lenses. These lenses are bayonet- or friction-fit to the front glass and are critically important accessories for underwater photography, which requires getting as close as possible to the subject. Water is 800 times denser than air and adds a cyan color cast, so the less of it between you and the subject, the better as far as color and resolution are concerned. You can get very close to corals or wrecks with a wide-angle wet lens and still get the entire subject in the picture.
For macro photography, the camera’s telephoto functionality, in conjunction with a wet lens, allows the photographer to fill the frame with tiny reef creatures.
SETTINGS
Compact cameras usually have a lot of easy-to-use automatic functionality if you prefer to point and shoot, but understanding the settings allows you to change some parameters in almost every compact camera, which can make a difference between a good and an outstanding image.
The white balance is one of the most critical variables. Automatic white balance usually gets a decent color, but some compact cameras have predefined settings for a sunny or cloudy day and might even have an underwater setting. The SeaLife Micro 3.0, for example, has a preset for shallow, deep, and green-white balance, which can be handy and easy to change.
You can usually change the image quality by shooting in either JPG or RAW format or choosing your video quality. Postprocessing is far more robust with RAW files, but you will need access to software such as Adobe Photoshop or Lightroom and some computer skills. If using automatic mode, you can analyze the results to see whether your photos are consistently too light or dark. Simply dialing in an exposure compensation preset may help deliver more quality images.
I like to use the lowest possible ISO speed for light sensitivity because the small sensors in these cameras don’t offer the dynamic range of a full-frame sensor. Lost shadow detail, blown highlights, and excessive grain become increasingly problematic at higher ISOs. A 1600 ISO might offer barely discernible grain with a flagship mirrorless camera from Nikon, Canon, or Sony, but the grain might be very distracting at that same ISO with a compact camera.
Understanding how different settings apply to the dive environment will ensure better photographs. Using the screen to review the image while shooting is a good idea to make sure it comes out well. Digital media’s incredible image capacity and immediacy of review are the transformational advantages of digital versus film, so take advantage of them.
STROBES AND VIDEO LIGHTS
You might use a compact camera with only ambient light, but it will likely be monochromatic unless you are in shallow water. Shooting with the sun behind the photographer and shining on the subject will usually result in the best images, while shooting a backlit subject often makes a visually confusing image unless it is a strong and obvious silhouette.
Sometimes you won’t have a choice during a dive, but it’s a good idea to photograph a subject from different perspectives if you can. You can easily go through the images later and delete the ones you don’t like, which is another advantage of digital photography.
For color in underwater photography, you will need to either work in very shallow water or use artificial light. The best housings support a tray with ergonomic handles for attaching lights. Strobes can connect to a housing via a traditional synch, but these systems increasingly depend on optical cables.
Some housings or amphibious cameras have no strobe connectivity, so the only option is a video light. The good things about video lights are that you don’t need any cables and you can see where your continuous light source strikes the subject, but they are considerably weaker than a strobe firing a millisecond flash at high power. You will need to be within 1 to 2 meters for even an intense video light to be effective, but you can see a big difference the deeper you dive and the less ambient light you have.
The video light will have minimal impact in bright sunlight, so it’s better to shut it off, save the battery, and avoid scaring away or distracting the animals.
COMPOSITION
As in nature photography, perspective and background are crucial in underwater photography. The correct exposure and the right motif are also required. If you photograph a fish’s tail fins only from behind, it looks like the fish is trying to swim away. While that may be true in reality, it is not the optimal composition.
Eye contact with the subject provides a dramatically improved perspective. Getting the picture free from disturbing elements — such as unsightly algae, undefined backgrounds, or featureless foregrounds — is not easy. The best questions to ask yourself are, Is the image you see through the viewfinder worthy of pressing the shutter button, and if not, can you make it so?
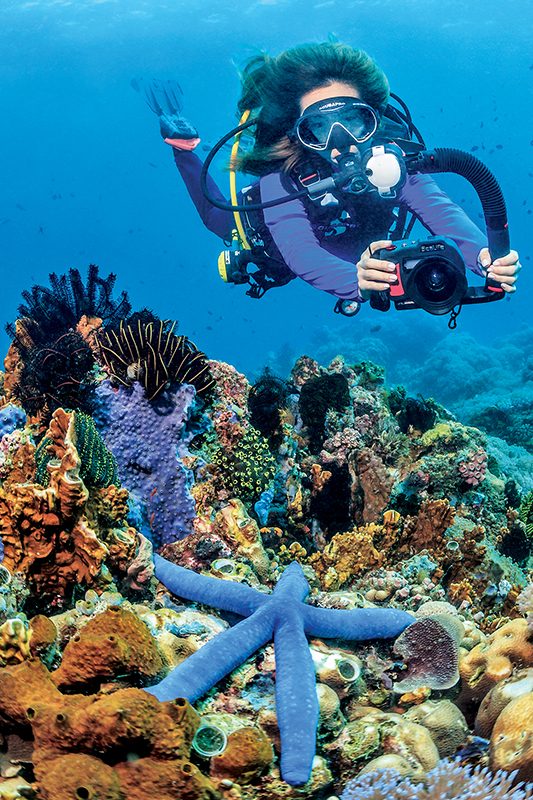
Small cameras have the advantage over large camera rigs in smaller environments. You can use this advantage to get angles of subjects that other photographers usually can’t do, but it’s always most important not to disturb or destroy any marine life while you shoot. If you consider these things during a dive and take them to heart, you can create better images.
Postproduction
Even though the image quality of current compact cameras is excellent, photos from them can often use a bit more contrast or color. The easiest way is to download or transfer the images to your phone, computer, or tablet and use a processing application to make small changes. The device’s native software can make some minor adjustments such as cropping the image, tweaking exposure, or modifying color or saturation. If those are not enough features for you, you can download other, sometimes free, apps such as Snapseed. Apps can provide more tools to enhance your image or reproduce effects.
Adobe Lightroom is probably the best and most-used tool for image postproduction. Almost anything is possible, but if you don’t know how to use the software, presets are available that will let you quickly edit an image.
To achieve the best quality during postproduction, set your camera to the best image or video quality available. Most compact cameras support RAW format, which is usually the highest quality.
The essential postproduction function is to enhance the image but leave it looking natural. Extreme changes can render an image unnatural or surreal-looking. AD
© Alert Diver — Q3 2023