Scuba diving can be a relaxing sport, but it also requires a certain degree of muscular strength and endurance. The weight and bulk of dive gear alone places an additional load on your body, and as divers we must always be physically and mentally prepared for the challenging conditions that sometimes arise in the dynamic underwater world. This new column is dedicated to sharing the best in fitness tips, techniques and practical exercises that will help you dive safer and stronger. In this issue we focus on the core — the abdominal and lower back muscles that control balance and stability. In subsequent articles we’ll also target the lower- and upper-body muscle groups that divers use most.
Building Better Balance
Strong core muscles are the key to improved balance and stability. Better balance and stability is the key to success in virtually all athletic performance, whether it’s driving the 18th green or just trying to keep your balance while donning dive gear. Diving presents unique challenges to the core muscles because the load placed on the body by dive gear is distributed differently than normal body weight. The result is a shift in your center of gravity upward and more posterior, forcing the core muscles to react differently than normal. When your core isn’t up to the task, common results include muscle strain (as other muscles attempt to make up for the core deficiencies), lower back pain and wipeouts on the dive deck.
The human body is a unique machine that responds directly to the stresses it encounters. Therefore, it is important to progressively train your core musculature to respond to the loads it will carry during dive activities. Divers require core muscles to predominantly work as stabilizers, and for this reason, strengthening the core through isometric training yields maximum benefits. “Iso” means “same,” and “metric” means “length,” so simply stated, you work the muscles by holding them in a fixed, tensed position.
The plank is an isometric exercise that targets just your abdominal muscles. The secret to performing a plank is to pull the belly button toward your spine, thereby engaging the deepest abdominal muscle (transverse abdominis), which helps support the back. Beginners may be able to hold the plank position for only a few seconds at first, but keep at it and you’ll see significant improvement in as little as two to three weeks. Alternate planks with arm/leg raises and work your way up to three sets of each exercise three to five times per week. Just as in diving, you should never hold your breath. It is important to keep breathing to avoid spikes in blood pressure.
Half Plank
FORM: Start by balancing on forearms and knees while keeping your body in alignment. Make sure that the elbows are directly under your shoulders and slowly move your knees backward until your buttocks are no longer sticking up in the air. Contract the abdominal muscles so that the back does not sag.
TRAINER TIPS: Keep your knees and forearms on a soft surface for comfort. Tilt the pelvis to keep the buttocks from sticking up.
CHALLENGE: When you can hold a half plank for 10 seconds, extend one leg to full plank and leave the other in half plank position. Repeat on the opposite side. When you can hold a half plank for 30 seconds, transition to a full plank.
Plank
FORM: From the half plank position extend one leg, then the other, transitioning your weight from your knees to your toes. Keep your elbows directly under the shoulders and hold your body in alignment by using your abdominal muscles to keep your buttocks from sticking up and your back from sagging.
TRAINER TIPS: If your back starts to arch, raise your hips slightly toward the ceiling. If you need to rest, drop one knee down to the half plank position.
CHALLENGE: When you can hold a full plank for 60 seconds, try hyper-extending (raising behind you) one leg, then the other, to incorporate the muscles of the lower back and buttocks.
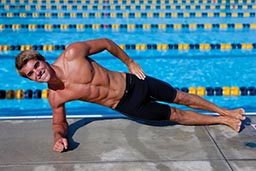
Side Plank

FORM: Make sure that your elbow is directly beneath your shoulder. Balance on your forearm and hip, then gradually raise your hip off the ground into a half plank position. Now raise your knees off the ground into a full side plank position. Be sure to engage your shoulder in this action. Place your top foot in front creating a split stance for improved balance and make sure that your elbow is directly under the shoulder. Hold the position for as long as you can — up to 60 seconds at a time. Repeat on the other side.
TRAINER TIPS: Keep your body aligned — you should be able to draw a straight line from foot to knee to hip to shoulder. It is easier to balance if you rest your unengaged hand on the hip throughout the exercise.
CHALLENGE: To ramp this exercise up, stack your feet on top of one another and try completing the side plank with the lower arm extended, balancing on the hand instead of the forearm. Extend the top arm as well for a greater challenge.
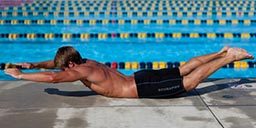
Arm and Leg Raise

FORM: Start by lying flat on your stomach, in a prone position, with your arms and legs fully extended. Simultaneously raise your opposite hand and foot off the floor. Hold each position for as long as you can — up to 30 seconds at a time. Then switch sides and repeat.
TRAINER TIPS: Keep your head in a neutral position (eyes on the floor), and raise your arms and legs in a slow controlled manner, as high as possible. When you feel as if your arms and legs are elevated as much as possible, try raising them a bit higher. You may surprise yourself.
CHALLENGE: When you can hold the opposite arm and leg for 30 seconds, try raising both arms, then both legs. Once you have mastered holding arms and legs for 30 seconds, try raising arms and legs simultaneously.
Note: Strenuous exercise following a dive may increase the risk of decompression sickness. DAN recommends divers avoid exercise for 24 hours after surfacing.
© Alert Diver — Q4 Fall 2009