RECOVERY IS AN ESSENTIAL ASPECT OF TRAINING. Delayed onset muscle soreness (DOMS) can happen 24 to 48 hours after a workout, and divers don’t want to be distracted by DOMS during their next dive. To improve muscle imbalances, relax muscles, increase mobility, and reduce soreness, try foam rolling.
Foam rolling is a form of self-myofascial release, which is the compression of soft tissues to reduce adhesions and restore tissue movement. Adhesions can occur naturally during the healing process in response to intensive training, injury, lack of mobility, repetitive motions, or even poor posture.
The following are some special considerations for foam rolling:
- Avoid foam rolling on bones and joints.
- The smaller the roller object, the more pressure it concentrates on a point in the body.
- Beginners should start with a soft, plain-surface, 36-inch-long roller with a 6-inch diameter.
- Experiment to find what works for you.
- Use the foam roller before or after a workout on most days of the week as tolerated.
To perform this routine, find a comfortable space and have a foam roller, mat, and possibly a pillow or towel available. Spend 30 to 90 seconds rolling about 1 inch per second on each area as tolerated. In this program, you will roll over the entire muscle, and then use tiny rolls back and forth, spending more time (10 to 15 additional seconds) on more tender areas, which should become less sensitive as you roll.
If an area is painful, work around it if you can. You may experience some discomfort, but never push through any pain. If it is painful, you may be causing additional trauma to the area, which is counterproductive.
Cross Leg Calf Roll
- Start by sitting on the mat with your hands flat on the ground next to you with your fingers pointed forward.
- Place your right calf on the foam roller.
- Put your left leg on top of your right, crossed at your ankles.
- Slightly push up on your hands, lifting your glutes from the floor.
- Slowly roll up and down your calf, continuing for 30–90 seconds.
- Switch legs and repeat.
Tip:
This is especially useful to relieve muscle soreness from finning.
Modification:
If there is too much pressure on one leg or you have difficulty supporting your body weight, try dragging your glutes across the floor to support some of your weight.
Challenge:
During the roll, rotate your big toe and then your little toe toward the ground.
Shin Roll
- Start on all fours in a crawling position.
- Place the roller under your shin on one leg, ensuring you are leaning to one side. Put your weight on the meaty part of your shin, not the bone.
- Support your weight with your hands.
- Roll toward your ankle and then back toward your knee, stopping before you get to each joint.
- Continue for 30–90 seconds.
- Switch legs and repeat.
Tip:
Keep pressure off your shin bone.Challenge:
Roll more slowly.

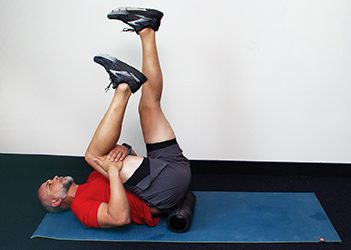
Hip Flexor
- Place the foam roller under your sacrum (above the glutes and below your lower back), and lie back.
- Let your feet support your weight.
- Bring both legs up.
- Grab one leg behind your knee, allowing your knee to go toward your shoulder.
- Extend the other leg, and let it drop without touching the ground.
- You should mostly feel the stretch in the front of your hips.
- Hold for 30–90 seconds.
- Repeat on the opposite side.
Tip:
Keep your extended knee pointed toward the ceiling. This technique is a static stretch with no rolling.Challenge:
If you need more of a stretch, bring your chin toward your chest.

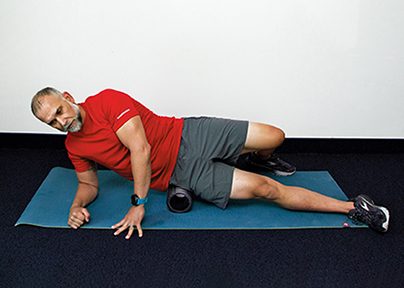
Tensor Fascia Latae (TFL)
- Place the foam roller on the floor.
- Place the side of your hip on the foam roller just below the bone.
- Put your elbow down, supporting your body weight with your forearm.
- Flex your bottom leg at the knee, and relax the muscles.
- Cross your top leg over your bottom leg, supporting some weight with your foot.
- Slowly roll forward and backward.
- Continue for 30–90 seconds.
- Repeat on the opposite side.
Tips:
Good balance helps reduce stress on the knee. You may want to put a pillow or towel under your forearm for cushioning.Challenge:
Roll farther backward to target your gluteus medius.
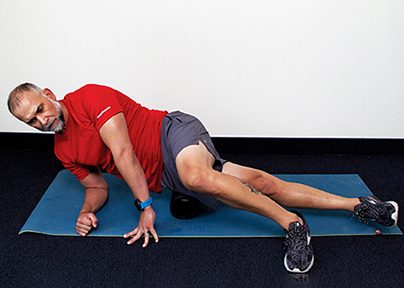
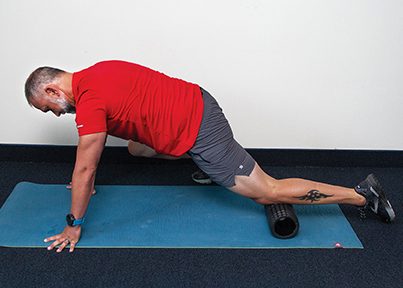
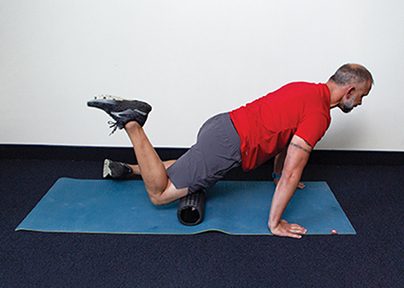
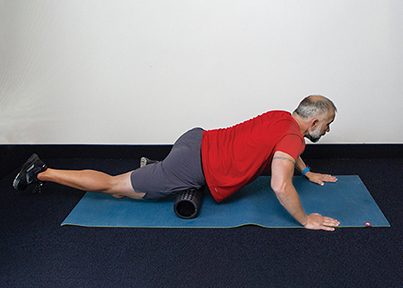
Quadricep Roll Outs with Knee Bend
- Start on your hands and knees with the roller just in front of your right knee.
- Place your left foot on the ground to support some of your weight.
- Put most of your weight, or as much as you’re comfortable with, on the roller.
- Begin rolling forward and backward.
- While rolling, stop when the roller is just above your knee, slowly bend your knee, and hold for one second before straightening it.
- Bend your knee again when the roller is in the middle of your quad and again when it’s just below your hip.
- Continue for 30–90 seconds.
- Repeat on the opposite side.
Tip:
Rotate a little to reach the front and sides of your quadriceps.Challenge:
Try to extend the roll from your hip to just above your knee.
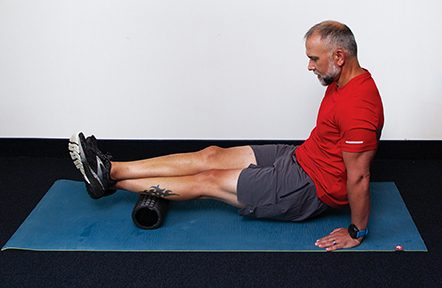
Bent Leg Glute
- Place the foam roller under your glutes with your knees bent.
- Cross one leg over the other.
- Lean toward the leg that is on top.
- Roll slowly from your sit bones (the bottom of your pelvis, which supports your weight when seated) to just before your hip bone.
- Continue for 30–90 seconds.
- Repeat on the opposite side.
Tip:
Find a position that is comfortable for you.Challenge:
Try to extend the roll, starting from another inch in both directions up to just before the top of your hip as you progress.
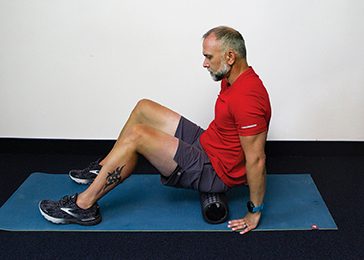
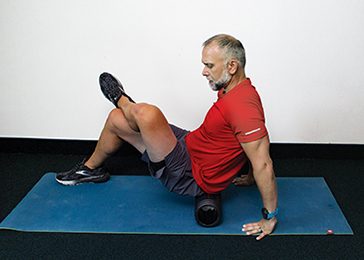
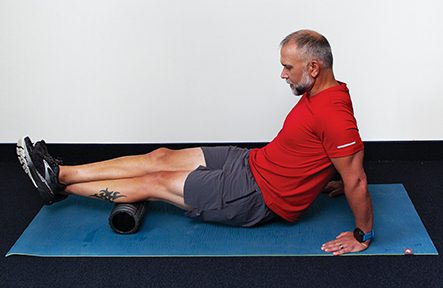
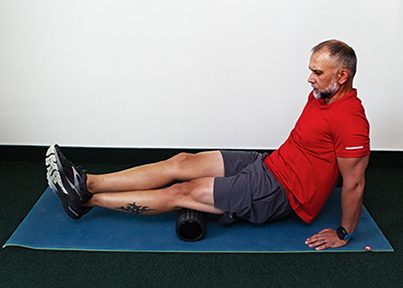
Hamstrings
- Start in a seated position with your feet on the floor and the foam roller under your knees.
- Rest the bottoms of your hamstrings on the roller, and cross one leg over the other.
- Place your hands next to your hips with your fingers pointing forward.
- Roll up and down your hamstring for 30–90 seconds.
- Repeat on the opposite side.
Tip:
Relax your shoulders.Challenge:
Rotate side to side on alternate rolls, pointing your big toe and then your little toe toward the floor.

NOTE: To avoid an increased risk of decompression sickness, DAN® recommends that divers avoid strenuous exercise for 24 hours after making a dive. During your annual physical exam or following any changes in your health status, consult your physician to ensure you have medical clearance to dive.
© Alert Diver — Q4 2022