The explosive popularity of underwater photography became blatantly obvious to me last year during a great white shark expedition to Guadalupe Island. It was the first day on location, and as part of the orientation the captain inquired, “Who in the group is an underwater photographer?” Of the 24 guests on board, 24 hands went up. “Crap,” I thought, “there goes my cage time!”
Now, their definition of “underwater photographer” and mine might be a little different, not only because I make my living by that definition while they did not, but because at least half of the group were using little point-and-shoot digital cameras in their original equipment manufacturer (OEM) housings; they didn’t even have external strobes. They didn’t use a big, digital single-lens reflex (DSLR) camera with a housing that cost many thousands of dollars, supported by powerful underwater strobes — in other words, a rig like the one I, and others who make their livings as photographers, use.
But their time in the cage, their access to the great white shark photo-ops and the pictures on their computers were every bit as important to them as mine were to me. It made no difference whether the final use of the image might be a national ad campaign, a double-page spread in a magazine or a thumbnail image on Facebook. The obsession to capture the best possible image was palpable and shared by every photographer on board.
The message was reinforced on a recent liveaboard cruise through the Cayman Islands. On the first day out, I was the last one on board to assemble my camera housing, and I had trouble finding room for my rig on the camera table. The space was already occupied by quite a cross-section of cameras and housings. There were a couple of high-end aluminum housings for SLR digitals as well as a few video housings, but it was a variety of compact camera rigs that occupied much of the table’s real estate. I recall seeing a new SeaLife DC1200 with dual Digital Pro flashes; an Epoque 9-megapixel camera and housing; an Ikelite housing for an Olympus camera with their Autoflash AF35; and a Sea & Sea DX-2G, complete with YS-110a strobe. There were also a couple of Canon housed cameras, one for their popular PowerShot G11 compact and another for the smaller PowerShot S90. There were even two compact cameras that didn’t need housings at all, an Olympus Stylus Tough-8000 and a Canon PowerShot D10, both of which are rated to 33 feet underwater without the need of an external housing.
Clearly, the choices in compact cameras are plentiful and varied these days, and the plethora of compact systems suggested an opportunity to me. At my request, two of the Aggressor team agreed to spend time sharing their thoughts on why they chose compact digital camera systems, as well as what they’ve done to optimize their success. They also agreed to share images, and the images within this article’s pages were taken with a compact camera system.
Why Choose a Compact Digital System?
The consensus seems to come down to three fundamental issues: price, convenience for travel and performance enhancements.
My gear probably cost around $12,000, including camera, housing, accessories and strobes. Compact camera systems, such as I saw onboard, cost considerably less. They ranged from a few hundred dollars for amphibious cameras from Canon or Olympus, to just under $1,500 for the SeaLife DC1200 and dual strobes, to a bit over $2,000 for the Sea & Sea DX-2G with a single external strobe. The prices on compact camera systems are certainly affordable, and now that the quality is consistently evolving, they make very attractive purchases.
The increasingly challenging airline baggage policies are also driving shooters to compacts. With exorbitant overweight charges, the compact systems can typically be carried on board, eliminating a checked bag and ensuring the camera is not damaged, lost or delayed in transit.
However, the biggest motivation of all seemed to be the steady improvements made to digital cameras today. Modern camera systems are entirely too sophisticated for their dismissive former moniker of “point-and-shoot.” Most cameras are in the 10- to 12-megapixel range, and all have brilliant LCD monitors for easy composition. Virtually all compact cameras shoot both video and still photos, and many have “underwater” modes to help overcome the cyan cast common in underwater photography. They have zoom lenses and integrated macro capability; the best systems have ergonomic means to trigger an external strobe or two, typically by means of a fiber-optic connection system. Some of them can even capture images in RAW, a more forgiving and information-rich format than the JPG-only to which earlier generations were limited.
How to Optimize Performance with Compact Cameras
The most important consideration is the “system,” or the housing and strobe combination that makes the best of the camera’s image-capture capabilities. The Plexiglas housings distributed by the various camera manufacturers are quite limiting, unless there is some easy way to add an external strobe. Don’t misunderstand, manufacturer housings are typically good, clever and robust; however, fiber optics require the “pipe” (end of the fiber optic) be perpendicular to the camera’s internal strobe. It is a hard thing to jury-rig with duct tape or Velcro, especially in an underwater environment. All of the serious compact systems on board had a way to affix the fiber-optic tube easily; they also had a tray and arm system to move the more powerful external submersible strobe farther away from the lens, for both serve to minimize the distracting white particles of backscatter that inevitably degrade the image when using only the camera’s built-in strobe. The importance of a good strobe on a compact camera system can’t be overstated; it makes all the difference between holiday snaps and photographic art.
Other techniques necessary to elevate the quality of underwater compact camera photos include:
- Get close. In all forms of underwater photography it is essential to get close and “shrink the water column.” Water is 800 times denser than air and has a color cast, usually blue, cyan or green (depending on the water in which you are shooting). Most of these cameras have either a 28mm or 35mm (in 35mm full-frame equivalent) lens at the wide end of their zoom range and focus very close.
- Know the camera intimately. The housings access all of the fundamental controls of the camera but may obscure some of the labeling. Housings that contain dedicated cameras, like the SeaLife and Sea & Sea, do a nice job labeling the housings as well. But whatever the camera and housing, more deeply-buried menu controls may require accessing two housing controls, either simultaneously or in sequence, or navigating through multiple pages of options. Gratefully, new LCD screens are bigger, navigation is more logical, and fonts are far more legible than the “prehistoric” digitals of two or three years ago. However, quick reactions to skittish marine life are best achieved when the operation of controls becomes intuitive. Knowing the camera exceedingly well topside gives one a huge advantage underwater.
- Read the owner’s manual. This is a corollary to the point above, but there are often specific “scene” modes that might enhance underwater photography. But without reading the manual, you might not know they exist! There are other modes that have special application functions, and knowing they exist may create imaging opportunities otherwise impossible. Examples might include in-camera panoramas, double exposures or rear-curtain sync (useful when choosing a slow shutter speed to imply action with motion blur behind the fish or diver). Every photographer should read the manual; if I hadn’t, I wouldn’t have learned about the SeaLife’s “spy” mode. This allows time-lapse images to be shot (best done with an underwater tripod) at intervals ranging from 10 seconds to 60 minutes. Cool features like that are often learned only in the pages of a manual; once you read it, then you get the fun of applying all the tricks you learned.
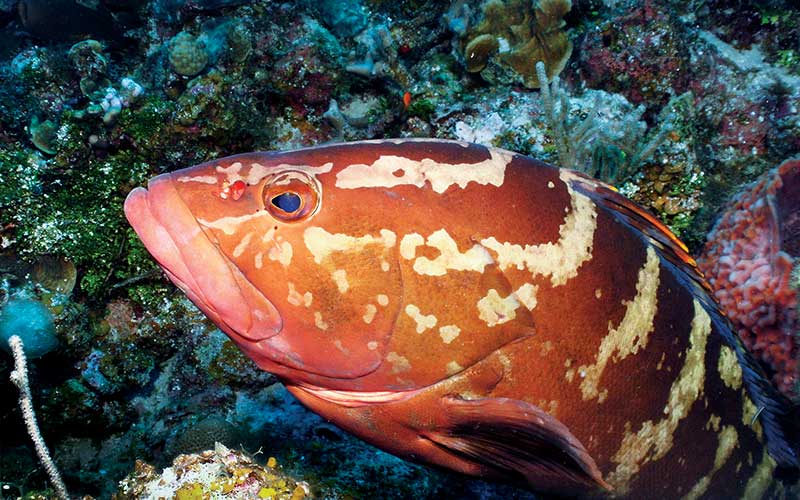
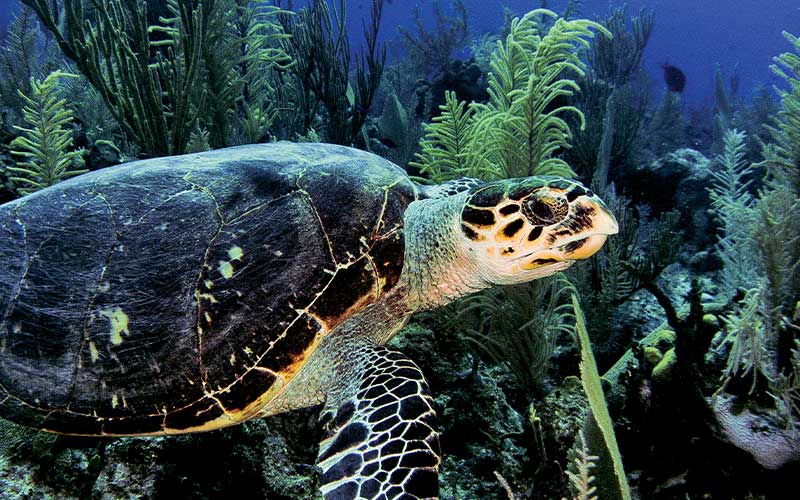
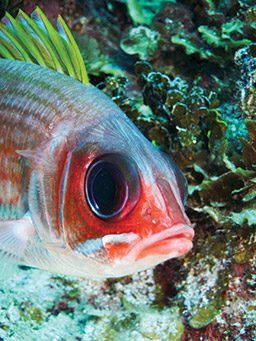
- Choose the right subject for the optic. Assuring the best images will be taken at a distance between a few inches to 5 feet from the front port, it is important to find the right-size subject to fit the composition in your mind’s eye. On the Cayman Aggressor IV, I saw stunning images of Nassau groupers, turtles, squirrelfish, coneys, parrotfish and macro-life like flamingo-tongue cowries, all captured on the Cayman reefs by photographers with compact cameras. On the other hand, many of the images of 5-foot Caribbean reef sharks weren’t so great; the lens wasn’t wide enough nor the strobes powerful enough to punch through the significant water column required to compose the shot. Had wide-angle accessory lenses been used, the photographers could have worked closer, obtained better resolution and color, and still composed the full-frame shark photo from 3 feet away.
- Minimize shutter lag. Shutter lag, the time between pressing the shutter release and the camera actually taking the photograph in its digital form, was quite slow in early iterations of digital point-and-shoots. So much so that it was very hard to take a good fish picture, simply because the fish was likely to have moved between the time the shutter was depressed and the image actually recorded. Modern compact cameras have minimized, though not entirely eliminated, this problem.
With many cameras, there is still enough delay to be problematic. However, good technique can help. Press down on the shutter release halfway to lock in the auto-focus, and then when composition is optimal, complete the shutter release. You’ll no doubt notice that if you separate the AF functionality and allow the camera to lock in the right focus first, the act of finally taking the photo will be much faster than doing the whole process (focus and shooting) in a single motion.
The advantages of low ownership cost and ease of travel are leading many underwater photo enthusiasts to compact cameras these days. They don’t offer the ultimate professional-image quality (yet), but they are remarkably good. They’ll look just fine on the web and small pictures for photo décor. It’s only when enlarged above 11×14 inches that the resolution disparity between a high-quality digital SLR and a compact camera is evident. But even that line is beginning to blur with a new generation of mirrorless, interchangeable-lens cameras with DSLR-size sensors such as the Olympus PEN, Sony NEX-5 and Panasonic’s Lumix G10. It’s an exciting time to be an underwater photographer, for the choices are spectacularly varied and powerful.
© Alert Diver — Q4 Fall 2010