The purpose of establishing a digital workflow is to help you organize and access your images more readily. A workflow for underwater digital photography is not very different from a topside digital workflow, except that you will want the ability to get a magnified view to inspect the sharpness and detail of your images as soon as possible to help identify your most extraordinary images.
When setting up a digital workflow, there are different methods that can achieve the same objectives. Before you get started, or restarted, make sure to build a framework that works for you. For me, I found that after I had achieved the best workflow I could using Adobe Bridge, I switched over to Adobe Lightroom, which made my workflow noticeably faster.
The concept of digital workflow is to ingest images in an organized manner. When you identify your “keep,” “show” and “winning” images, focus on establishing the initial process for the “show” and “winning” images prior to exporting them. Winnowing down the universe of images to photos that might eventually be used for display is helpful at the very outset.
Framework
One of the most important and often overlooked tasks in workflow management is setting up a hard drive system for your image archive.
When I go on dive trips, my images end up in three places by the end of the week: 1) on the original Secure Digital (SD) or CompactFlash (CF) cards; 2) on my computer desktop; and 3) on a portable 1-TB external hard drive. Once home, I transfer the folder of dive-trip images to my master hard drive working system (an 8-TB drive) and then to a backup drive. Once the transfers to the master hard drive and backup are complete, the CF or SD cards, desktop folders on the travel computer and external drive folders can be dumped to “trash” and/or reformatted. Experience has led me to this method. It does require me to have enough CF or SD cards that I can keep them as backup sources until I transfer the folders into my master home system. Your personal sense of economy may suggest something different for you.
At the beginning of each year I like to purpose a new 4-, 8- or 16-TB hard drive to store the images for that year. A portable 1- or 2-TB external hard drive can become your master image (or backup) folder when traveling. Establishing such a framework will improve your workflow immediately and dramatically.
Above all, avoid filling up your external drive or forgetting to back up your images on your CF or SD card. Too much data on a portable drive makes your images vulnerable to physical loss or mechanical failure. How many of us have formatted an SD card only to find out we hadn’t finished transferring the files? Either mistake can be calamitous.
Establish Your Hierarchy
Before you travel, it is imperative that you establish your own file-folder hierarchy in your master hard drive system. Keep in mind, however, that you may choose to create new folders as needed either when exporting from Lightroom or directly inside the folder directory.
While traveling, adhere to a system that will fit seamlessly into your file-folder hierarchy once you import your travel images back into your master hard drive. This is one of several areas where individual workflows tend to differ — others include file naming, metadata, keywording and catalog management. Make your file-folder hierarchy as simple or as complex as you need, but remember that this hierarchy will become one of your best friends when you need to access images from your backup system via manual search.

Here is an example of my simple file-folder hierarchy to the right:
You can establish this list as you work through the shoot, creating new folders as you need when exporting from Lightroom or building directly inside the folder directory.
From my home archive, I use the command sequence >File >Export as Catalog, and then on my main computer I use >File >Import From Catalog. You can also simply drag and move your folder onto your main computer and then import into Lightroom.
Initial Catalog Ingest
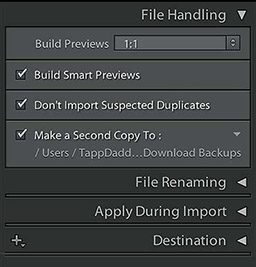
When you are ready to ingest your catalog, connect your SD card or portable hard drive to your computer and select “Import” from the Library module in Lightroom. Lightroom will show you thumbnails of your incoming files. You can exclude unwanted files by unchecking them or have Lightroom automatically uncheck previously imported images by selecting “Don’t Import Suspected Duplicates” under the File Handling selection.
“Build 1:1 Previews” for finding your “keep,” “show” and “winning” images. This will take up more time at the beginning of the process, but when you are inspecting your images quickly for sharpness, this allows Lightroom to draw 1:1 previews quickly. If you don’t like it, you can always discard this feature anytime in the Library menu. You can also allow this process to happen in the background as you go have a glass of wine or watch the sunset at the end of the dive day. What is nice about this feature is that when you are viewing your image you can click once to automatically zoom to the 1:1 ratio without having to wait for it to redraw the 1:1 view, which allows you to check focus and sharpness instantly. Then you can click on the image once again to return to the full-frame view.
“Smart Previews” are designed so you can use the “Develop” module features on any of the images even if your images are on an external hard drive that is disconnected from your computer. As soon as you reconnect the hard drive, Lightroom will apply any tool use and Develop adjustments (XMP data) onto the images and the metadata.
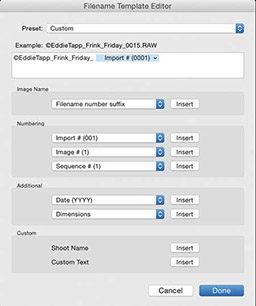
“File Renaming” will give you a comprehensive file-naming convention option if you have specific needs to rename your files on ingest.
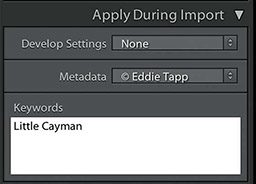
“Apply during Import” will give you options to apply any preset develop settings, metadata and keywords.
While keywording is extremely powerful for quickly finding specific collections, it can also be extremely laborious depending on how detailed your keywords are during the ingest stage. One option to expedite the process is to keyword only the location or dive site while ingesting. Then you can select specific images post-ingest to which you can add a more comprehensive keyword after your “keep,” “show” and “winning” image edit session.
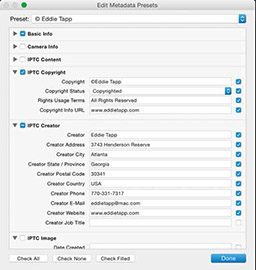
The “Metadata” option is perhaps the most critical option at the ingest stage, as it gives you the ability to insert your contact information and apply a copyright notice on each image automatically. Once you have set up a metadata preset, it will be a “sticky” selection on the next ingest, meaning that the information will already be set to the last used preset for you. This way, once you set it up, you can use your metadata preset from that point on until you purposefully change any of the fields.
Rating: Keep, Show and Winning
Here is the stage in the process when you really need to establish self-discipline in your digital workflow. Once my images are loaded, I like to begin with my first image in full frame. (Tapping the “F” key once shows the image full frame in Lightroom, while tapping it a second time returns you to LR view.) With my right hand on the right or left arrow key and my left hand on the 1, 2 or 3 key, I quickly scan through the images while rating them images as follows: one star for “keep,” two stars for “show” and three or more stars for “winning.” Any images with no stars can be deleted. Keeping too much digital detritus clogs hard drives and bores viewers, including yourself.
1 star: The keep images are ones that you will review again to see if you should up-rate.
2 stars: The show images are ones that you will show your friends or clients.
3, 4 or 5 stars: The winning images are the ones that you will apply a special process in the Develop module and even perhaps export into Photoshop for more advanced image-enhancement processes.
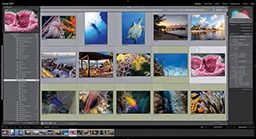
I call this rating process “peripheral editing,” because after a short time the process becomes second nature. The key to making the most out of peripheral editing is to go with your initial feelings during the first pass; that way the second time you view the selects you will only be looking at the keepers, which makes up- or down-rating much easier.
Should you wish, you can add to this system by tapping the “X” key for images that you will definitely want to trash, such as out-of-focus shots or images that you never want to see again. Once you’ve rated the images, from the menu select >Edit>Select by Flag>Rejected and press “Delete” to remove these images from your disk.
If it appeals to you, the 6-9 keys apply color labels (red, yellow, green and blue, respectively) to your thumbnails, giving you an additional method of sorting beyond the 1-5 star ratings. The zero key removes a star rating, and retyping the key for the color label you added removes that color.
Develop
When you are done rating your photos, you can move to the “Develop” module in Lightroom and use the powerful features of basic, detail, lens correction and other tabs and tools to generate color and tonal control on your “show” and “winning” images. This module also allows you to easily sync image settings with other images created in the same light or scene.
The “Basic” tab houses the primary controls for tonal and color processes. The “White Balance” tool (eye dropper) works very well for initial underwater color corrections, while the slider controls for “Highlights,” “Shadows,” “Whites,” “Blacks” and “Clarity” work in conjunction with tone and contrast. You may also try adding a small about of “Vibrance” for certain images.
Some of my more rarely used but powerful corrections reside in the “Detail” tab. Lightroom’s “Detail” tab has very fine noise-reduction features, including a “Luminance Slider” to control the grainy noise (use between 25-50%) and a “Color Slider” for any blooming color (pixel) noise, which is best for high-speed, ambient-light, underwater control.
The “Profile” tab inside the “Lens Correction” tab enables profile corrections for specific lenses. Lightroom automatically picks up the camera and lens metadata and then applies lens barrel distortion and edge vignetting corrections that are typical for that optic. Of course, you can also “season to taste” with the slider controls for your specific lenses.
In the latest versions of Lightroom, tools such as the new “Radial Filter,” “Adjustment Brush” and “Spot Removal” give you immediate advanced enhancement capabilities.
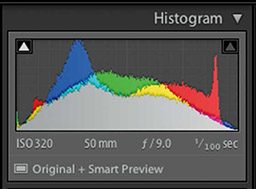
Lightroom’s Histogram not only gives you vital information regarding your tonal volume, but there are five distinct zones in the Histogram that you can click and move to adjust. These zones are (from left to right) black, shadow, mid-tone, highlight and white.
Lightroom to Photoshop
Transferring your images to Adobe Photoshop will give you an entire world of enhancement and correction techniques that are not readily available in Lightroom. To do so, right-click on a thumbnail icon and select “Edit In.” From there, you can choose Photoshop, third-party filters and more.
Lightroom is a nondestructive image-editing software, meaning that all the adjustments and changes you make in Lightroom are only a set of instructions to be implemented when exporting or transferred to another application such as Photoshop — with one exception. That exception is the option to “Open as a Smart Object in Photoshop.”
If you open an image as a “Smart Object” layer rather than a pixel layer in Photoshop, the nondestructive properties remain intact, and any adjustments made in Lightroom are instantly accessible by double-clicking on the thumbnail icon in the Layers panel. This will take the image directly into the Adobe Camera Raw (ACR) processing interface. Here you will find the same adjustments you made in Lightroom only with a different user interface.
Whether working with a traditional Photoshop file or a Smart Object, once you have finished your enhancements simply save the file by hitting command-S or control-S. The file automatically saves itself as a TIFF by default back to Lightroom as a second file. If you work with RAW files, the original file will have a .CR2 (Canon) or .NEF (Nikon) file extension to immediately differentiate it from the .TIP that evolved from your Lightroom adjustments. When you sort by “Capture Time,” the images remain visible next to similar images shot at the same time.
Exporting
One of the most important features of Lightroom is its inherent ability to work with your RAW files in a very wide color gamut, ProPhotoRGB with 16-bit data automatically, which allows you to take full advantage of the original image data and quality.
When exporting my images for printing, I choose the JPEG format and sRGB as color space with 100% quality in the Export dialog. This setting takes full advantage of the image enhancements generated in 16-bit and ProPhotoRGB, yet with a smaller file for transmission. For the Internet, I use the sRGB and format at 70% quality, then resize to fit “Long Edge” at >2400 pixels. Then I “Sharpen for Screen” and use a watermark, which, if you choose to do the same, can be as simple as your name or an embedded logo.
Explore More
© Alert Diver — Q1 Winter 2015