Note: When providing first aid, caregivers should always take steps to protect themselves from injury or harm. This includes taking the time to use personal protective equipment such as gloves, especially when dealing with body fluids.
Few thrills can match that of discovering a virgin reef or diving a remote section of shoreline. Exploration is a big part of diving, so it’s no surprise that divers tend to venture off the beaten path. Whether we travel to a distant island in the Pacific, a quarry out in the country or a popular wreck just a few miles offshore, we can easily find ourselves with limited or delayed access to medical care. For a dive buddy turned caregiver in a wilderness setting (defined as any location that is more than one hour from the nearest hospital), it’s important to know some basic first aid techniques. The general steps covered here will help you care for an injured diver in an emergency, but this column is no substitute for proper first aid training.
Wounds are a type of injury that warrants special consideration. Consequences of improper wound care range from unsightly scars and delayed healing to severe infection and even death. With a little bit of knowledge, a first aid provider can significantly improve the outcome. Regardless of the type of wound, there are three basic steps to proper wound care: control the bleeding, prevent infection, and promote healing.
Step 1: Control Bleeding
The first concern with any wound is whether the patient is at risk of shock or death from blood loss. Any wound that is bleeding more than a little bit requires intervention. Controlling the bleeding can even be considered a “C-step” problem, to be addressed immediately after establishing that the patient has an airway and is breathing (steps A and B). After all, the brain and other organs of the body cannot function without a steady supply of oxygenated blood. The first step in getting the bleeding under control is to apply direct pressure to the wound. Press directly on the wound, and press hard enough to slow the flow. Absorbent materials like gauze, cravats or rags can be helpful, and it’s not required that they be sterile. While applying pressure, elevate the wound to use gravity to your advantage. Direct pressure and elevation should be sufficient to stop the bleeding from almost any wound. If the flow of blood isn’t slowing after a few minutes, the next step would be to apply a tourniquet, but that’s an advanced technique that requires specialized training and is beyond the scope of this article.
Step 2: Prevent Infection
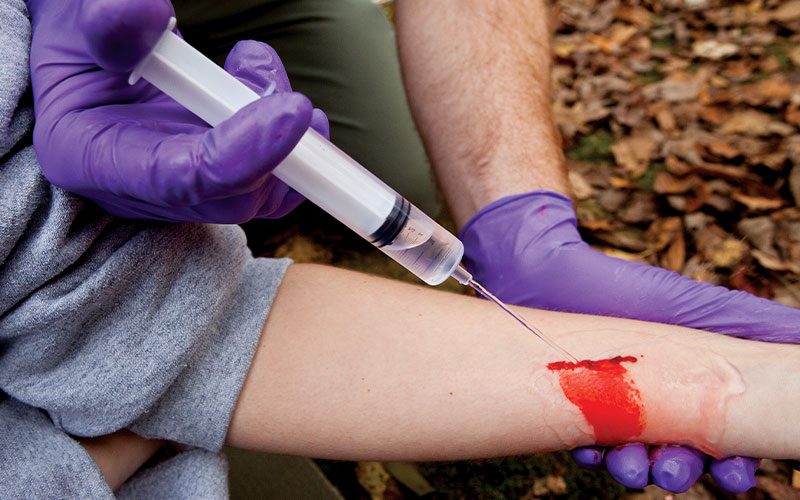
The best way to prevent infection is to clean the wound thoroughly. This means reducing bacteria, removing foreign material and discarding dead tissue. The most important step in wound cleaning is irrigation of the wound. Irrigation is best done with a syringe (no needle required) that creates a very narrow stream of water. This allows the water to be forced through the wound with significant pressure to remove bacteria and debris. This procedure utilizes the mechanical force of the water pressure rather than a chemical to clean the wound. Any water that’s clean enough to drink is clean enough for wound care. It’s wise to use a significant amount though — a half liter or more.
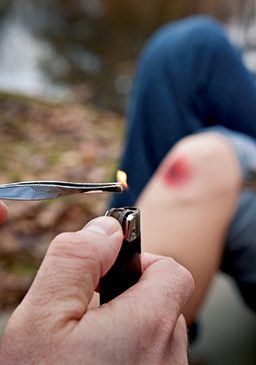
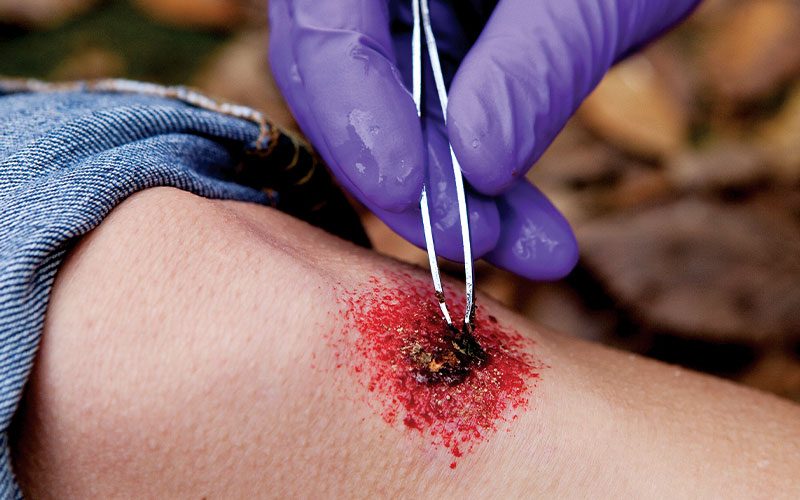
Next, use an alcohol wipe, a piece of gauze soaked in povidone-iodine (Betadine), or even a clean cloth, soap and water to scrub around — but not inside — the wound. This reduces the likelihood of bacteria on the skin contaminating the wound. Avoid getting alcohol, iodine, peroxide or soap into the wound, as these can be harmful to living tissue and actually hamper healing. Use sterilized tweezers to remove any foreign debris or dead tissue that comes away easily. The tweezers should be sterilized by soaking them in alcohol or iodine or holding them in a flame long enough to blacken the metal. Let the tweezers dry or cool before using them, but don’t blow on them or wipe them on a non-sterile surface. Further irrigation after scrubbing and de- bridement may be appropriate.
If a wound is especially dirty, was due to a bite or has an increased infection risk for another reason, it is a good idea to irrigate with a 1 percent povidone-iodine solution. Dilute the iodine with water until it is the color of iced tea. If you use an iodine solution, make sure to finish with several streams of plain water so as not to leave the iodine in the wound. In the case of a puncture wound, it is best to limit irrigation to the surface to avoid forcing additional bacteria and debris into the puncture. In puncture wounds that don’t bleed very much, it may be appropriate to tease the edges of the wound slightly to encourage a little bleeding as this can help clean the wound. Abrasions (scrapes/road rash) can be prone to infection because of the greater surface area involved and will benefit from a thorough scrub all over with soap and water after debridement. Make sure to finish with irrigation to get the soap off.
Step 3: Promote Healing
Promoting healing means doing two things: dressing the wound and bandaging it. A dressing goes directly on a wound, and a bandage holds a dressing in place. Adhesive bandages and gauze pads work well directly on the wound. Medical tape, roller gauze and triangular bandages are options for keeping the dressings in place. There are also a variety of “high-tech” dressings and bandages available from first aid suppliers as well as “low-tech” options such as boiled, then dried, scraps of T-shirt. The wound should be kept covered since tissue grows best in a warm, moist environment. Make sure to check the bandage daily for signs of infection. These include increasing pain, redness, swelling, drainage, foul odor and pus. These symptoms should prompt the caregiver to re-clean and re-dress the wound. If an infected wound is getting worse or is accompanied by fever, red streaks, fatigue or generalized aches and pains, the patient should be evacuated as quickly as possible. Almost any wound that takes place in a marine environment has a high potential for infection. The ocean is full of bacteria as are the mouths of morays, the surfaces of hard corals and the spines of sea urchins. This should prompt thorough wound cleaning and careful monitoring for infection.
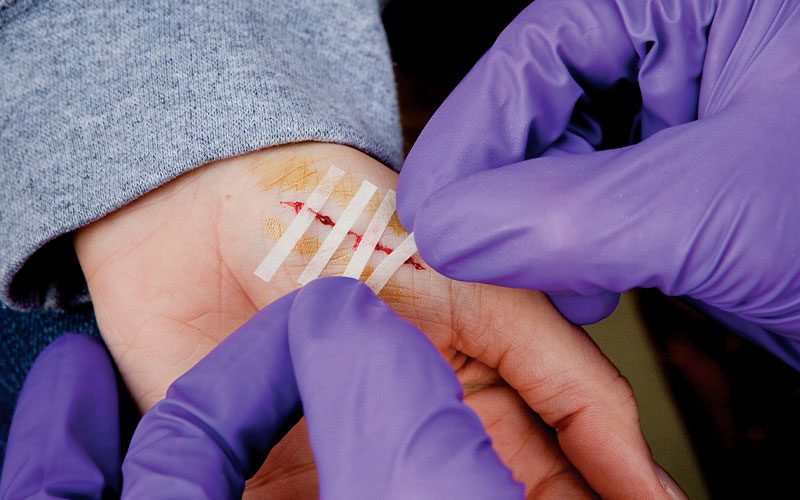
For small lacerations or incisions (cuts), butterfly bandages or steri-strips can be used to close wounds once they have been thoroughly cleaned. Use the strips to gently bring the edges of the skin together. Wounds that gape wider than a half-inch can’t be effectively closed in the field. Instead, gently pack them with moist gauze and add a layer of dry gauze on top. For abrasions, apply antibiotic ointment or petroleum jelly to the affected area and cover with a gauze dressing to help the wound stay moist. Impaled objects should always be stabilized in place except when they impair breathing or transport of the patient.
© Alert Diver — Q1 Winter 2010