We kit up on a small wooden bench beside a pickup truck, enclosed by an impenetrable green wall of jungle. There is no view of water — our destination is a wooden staircase leading down into a crack in the earth. This is a surreal setting for a dive, and it leads to an entirely fresh experience. If you want to expand your diving and photographic horizons, then a trip to Mexico’s cenotes should be at the top of your list.
The wooden steps lead down into a pool of smooth, dark water. I slip in and dip my head into El Pit cenote. Suddenly I feel much smaller. This tiny plunge pool is the opening to a huge world underwater and underground. Looking down I can see for about 100 feet, but I can’t see the bottom. In front of me the cavern extends away into the darkness. My anticipation and heart rate increase.
Dark Demands
Crystal-clear water usually makes photography easy, but don’t underestimate the challenges of the dark. Cenotes — deep, natural, water-filled limestone wells or sinkholes — are much darker than you might expect, which can make it difficult to focus and determine exposure.
For focusing in the cenotes, I use back-button, or thumb, focus. This mode, which most cameras offer, allows you to decouple the autofocus from the shutter release and assign it to a button you press with your right thumb. This means you can focus carefully when there is light at the start of the dive and then leave it locked so the focus does not struggle in darker places. A dedicated focus light is often a hindrance in this type of photography because its beam, which will be much brighter than the dark conditions in the caverns, will show up in your pictures. This problem is exacerbated by the slow shutter speeds often used.
The darkness also presents a challenge for exposures. It necessitates using settings that are way outside of our normal comfort zone. For example, even the photo of bright sunbeams was at first underexposed and needed a higher ISO of 1600, an aperture opened to f/8 and a shutter speed of 1/25th of a second to achieve the look I wanted.
There are no magic numbers I can tell you to dial in. First, cenote light levels are variable. Second, how each of us adjusts the aperture, shutter speed and ISO from our open-water settings will depend on our cameras. We can push newer cameras, for example, to higher ISO values than we could with older models and still perform admirably. Full-frame cameras can use higher ISOs without objectionable noise, but we may need to use a smaller aperture to achieve acceptable corner sharpness. Image-stabilized lenses can be pushed to slower shutter speeds than can nonstabilized lenses.
It is best to think about your camera’s settings and capabilities before you dive rather than trying to make a call about what to sacrifice while underwater. As a rule it is sensible to compromise a little on all three settings (aperture, shutter speed and ISO) rather than a lot on any one. Finally, breathe in slowly while shooting long exposures, as breathing out will create bubbles that might vibrate the camera.
The other challenge with exposure is getting it right for the dive rather than relying on adjustments in postproduction. This is especially important when you shoot at high ISO values, because typical adjustments to exposure in Adobe Camera RAW or Lightroom generate a lot of noise. Furthermore, your LCD will shine brightly in the dark of a cavern, making it easy to think an underexposed image is properly exposed. If in doubt, check the histogram or have an above-water image as the first shot on your memory card for comparison.
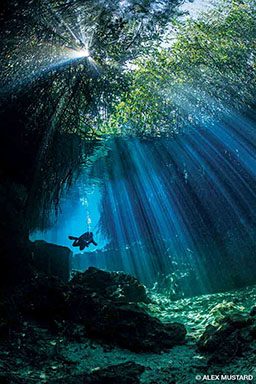
Sunbeams
Few subjects are as beautiful or as emotive as beams of sunlight spiking down into the water. The cenotes’ calm water tightly focuses the rays, and against the darkness of the caverns they elicit comparisons to laser beams.
The key to capturing them is to position yourself in the dark, looking back at the beams. Ideally you want a viewpoint that hides the surface, so the beams are the brightest subject in the frame. The more you can overexpose the scene, the brighter the beams will be. If you haven’t hidden the bright surface in your composition, it will overpower the rest of the frame, and the shot won’t be as stark. You may also end up with clipped highlights that can’t be recovered.
Adding strobe light usually ruins the ambience in these photos, so unless there is something spectacular in the foreground, turn off your strobes. Fisheye lenses are usually the default choice in caverns because they really open up the space. When shafts of light run close to the edges of a fisheye shot, however, they will bend. Careful composition keeps the bending to a minimum, and you can also straighten the lines in postproduction using lens correction.
Although the sun most easily penetrates a pool of water in the middle of the day when it is highest in the sky, the complex shapes of cenote openings mean that the best beams come at very specific times of day, which shift over the year. All the good operators know when the beams are at their best in each cenote and will plan your diving accordingly at your request. You should also pay attention to the weather forecast and focus on beams during sunny periods and speleothems on cloudy days.
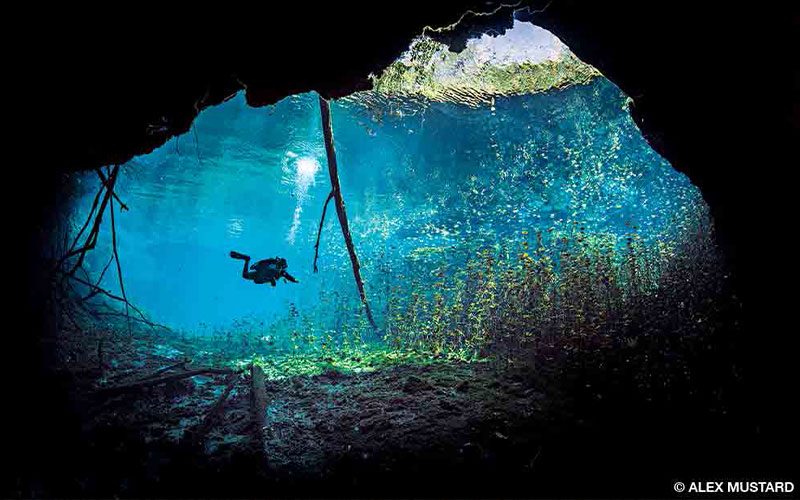
Divers in Dark Places
Cenote scenery is captivating, but 90 percent of the time it looks better with a diver in the frame to provide a sense of scale and a compositional focal point. Many serious photographers will dive with a private guide and ask him or her to model. Few divers have the precise buoyancy control and maneuverability of a professional cave diver. Some guides dive with twin tanks on their backs, while others dive with sidemounts and a helmet. If you prefer a particular look, choose a guide that uses that configuration.
When photographing people underwater, details matter. Gear should be correctly configured and trim, and buoyancy and respect for the environment should be exemplary (these should be a given when the model is a guide). To ensure illumination of the eyes, the model should face toward the camera but not stare right into the lens. If a subject is between the camera and model, the model should look at it. Otherwise, the model should look in the direction he or she is moving, the direction the torch is pointing or slightly above the camera’s lens. I aim my focus torch toward myself so my model can follow my hand signals in the dark.
Whether your guide dives sidemount or twin set, the one thing you can guarantee is that the equipment will be almost totally black, which means the guide will be easily lost in the background in a dark cavern. When possible, position the diver in front of light coming in from an opening. You might be able to occasionally position the model near a white limestone backdrop, but deeper inside caves you will usually need an off-camera light source behind the diver. Although this greatly increases the workload, it has several significant advantages: It helps the diver stand out, it creates greater depth in your composition, and light framed by a darker foreground creates a very pleasing atmosphere.
Off-Camera Lighting
Like any craft, photography requires the right tools for the job. This is especially true when using off-camera lighting, which is difficult even with proper gear and massively frustrating when the equipment is imperfect. Practice with your remote strobe before you dive, and triple check that the system is working. Using off-camera strobes is time- and attention-consuming, and time and attention are vital resources in a dark overhead environment. Remember that safe diving always comes before photography. It’s smart to make a few cenote dives before you take a remote strobe with you. Being in a cavern you’ve dived before is a handy advantage.
The basic setup is a strobe that has a separate slave sensor trigger so the remote strobe can be hidden from the camera. You’ll also need a mount such as a plastic GorillaPod for positioning and aiming the strobe. Alternatively, you can ask models to hold the strobe (aimed away from the camera) or attach it to their scuba tank to illuminate the cave behind them. Many photographers make the mistake of using a small spare strobe for off-camera work. In fact, the best off-camera strobe is your most powerful, widest-angle strobe.
When setting up a shot, start with the remote strobe on high power and your on-camera strobes on low power. Then adjust your aperture to correctly expose the off-camera strobe, which will prevent you from having to swim back and forth to adjust it. Then you can turn up your on-camera strobes to light the foreground if desired. Finally, adjust your shutter speed to control any ambient light in the scene or to make the beam from the diver’s torch weaker or stronger. Remember that the diver’s torch is another form of ambient light, and shutter speed controls how bright it appears at a given aperture.
When working with a GorillaPod strobe, it’s best to place it on the floor of the cave hidden behind the model. Aim it either at the features behind the diver, if they are near and interesting, or toward the camera. You can also hide the strobe behind a feature such as a stalagmite to better illuminate the background. If a cave feature completely hides the slaved strobe, you may need a pigtail slave sensor on a cord pointing toward the on-camera strobe to ensure the slaved strobe fires. If only the sensor is in front of the feature, it may not be noticed, or it can easily be cloned away in postproduction.
A diver who is holding the off-camera strobe should hold it in the hand that’s farthest from the lens, pointed behind him or her. If you have two buddies willing to help, one can be the model, and the other can hold the off-camera strobe. Instruct the diver with the strobe to always keep the model between him or her and the camera. You can move through the cave photographing the model, while the other diver provides backlighting and doesn’t appear in the photos.
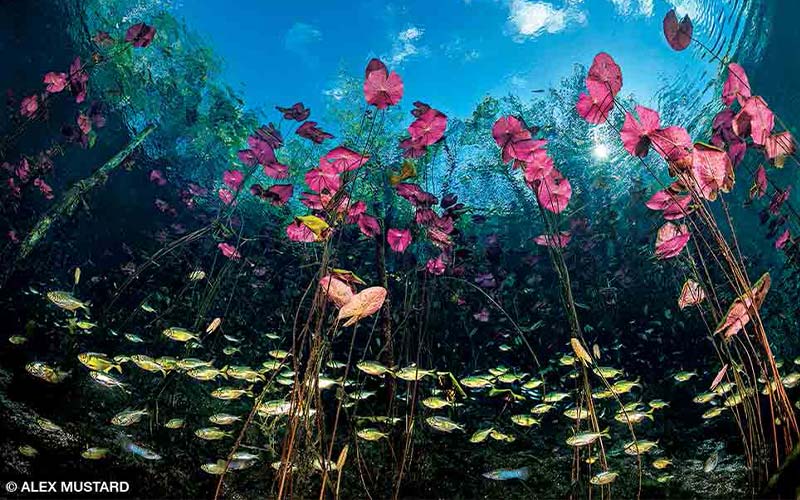
Whether we photograph cenotes with the simplicity of available light or use advanced techniques such as off-camera strobes, they are a fabulous studio for imaging. Perhaps what is most addictive about them is that they look so different from the ocean and thus diversify our underwater photography portfolios.
Caves and Caverns
Mexico’s popular cenotes offer two types of diving. Cavern diving is open to all and takes place always in view of the light of an entrance, although it still involves going into some very dark spaces. Cave diving is a technical discipline that requires special training and equipment but allows divers to explore the fully dark and less-visited parts of the cenotes.
Full-blown cave diving gives a photographer access to the best cave formations, but don’t underestimate the photographic potential of caverns. All the images in this article were taken during cavern dives that any open-water diver can experience. The cavern areas still have attractive speleothems (stalactites and stalagmites) and the big advantage that the beams of sunlight that penetrate at the openings are the most attractive subject of all. All cenotes are on private land and require diving with a specially qualified guide. In most cases photographers are asked to pay a little extra for diving with a camera.
| © Alert Diver — Q4 2017 |