My fascination with splits (or over-under shots) started with my love of oil painting; I would compose paintings that combined my love of both the sea and land. When I started diving, I wanted to capture all the beautiful and exciting underwater imagery, so I picked up a camera and started shooting. Once I began taking underwater photographs — especially splits — I was hooked. With photography I could express my creativity and share the amazing underwater world with others.
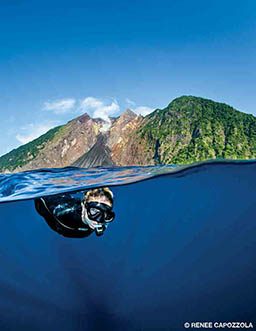
Split shots not only catch your eye but also tell a story of two worlds: the aquatic and the terrestrial. It is like looking simultaneously into two dimensions. People cannot naturally see simultaneously both above and below the waterline, so splits show an otherwise inaccessible view. To compose a successful split, your shooting techniques need to be up to speed. Learn these important tips, then get in the water and practice.
1. Use the proper equipment.
Trying to get by on merely adequate equipment does not always cut it. For my first attempt at taking split shots at Fakarava near Tahiti, I had a 4-inch dome and a camera that had only a live view on the display screen, which I could not see in the bright sun. This attempt worked poorly. While not everyone will invest in the ideal setup for splits, the more of the following equipment you have, the easier it will be for you to capture successful images.
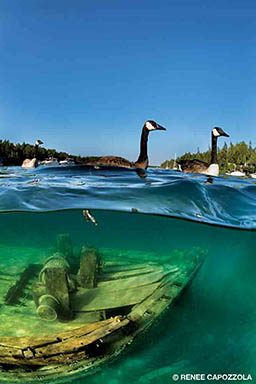
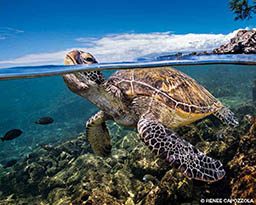
- Wide-angle lens. I now prefer a rectilinear lens for wrecks or topside scenery with straight lines. If I’m shooting larger animals with an island in the background, I will use a fisheye lens, which I think works best for getting both the background and foreground in focus. For shooting midsize marine life, such as turtles, I will likely stick with a 16-35mm rectilinear lens and shoot at the wider end. I recently experimented with an 11-24mm rectilinear lens, but I did not think it did a good job with corner sharpness at 11mm, so that would not be my first choice in most cases unless I was shooting something like a large wreck.
- Large-diameter dome port. Use the largest dome port possible. In this case, bigger really is better. Larger dome ports help with focusing, as the virtual image is farther away than with smaller domes. Keep in mind that the smaller the port, the less surface area you can cover, which means you will need calmer water to obtain a thinner meniscus (the curve of water against the dome port). A 9-inch or even larger dome is ideal, but 7-8 inches will get the job done. I prefer glass instead of acrylic, because glass minimizes distractions from water droplets; however, glass is more costly and heavier for travel.
- Camera performance. A digital single-lens reflex (DSLR) camera is my preference because it provides a better chance of getting the waterline exactly where I want it. In any case, use a camera that you can set to continuous firing mode. You should also make sure your camera has an optical viewfinder, because you may not be able to see the display screen in bright conditions.
2. Plan your shot in advance.
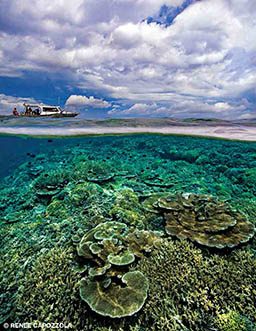
Splits tell a story, so think about the story you want to tell. Besides your main underwater subject, such as a turtle or shark, you should think about the above-water composition. Choose an interesting subject for the background, such as an island, a beach, a boat or the subject itself if it is breaking the surface. Splits are possible on the fly, but preplanning your shot can make all the difference as to whether you nail the shot or not.
Keep in mind that it is best to shoot in clear water that is very shallow, such as mangroves or a 2- to 3-foot-deep reef. You can also shoot splits in deeper water if the underwater subject is close to the surface.
I take most of my split images while I’m snorkeling. In my opinion, splits are easier to shoot when you are not lugging around a heavy tank or worrying about running out of air. You can also stay in the water as long as you want, waiting for the right moment. While on scuba I occasionally follow a turtle from deeper waters to the surface, but when that happens I usually don’t get the image I want because I don’t have enough time to plan my shot or I have to allow time to offgas before surfacing.
3. Make ambient light work to your advantage.
Splits work best in bright sunlight with the sun either behind you or directly overhead. Because the top half of the image will be brighter than the underwater half, try to shoot at midday, which offers the best light penetration through water. The lower the sun is in the sky, the less light you will have underwater. Even with the sun high in the sky, the underwater portion of your image will be darker than the above-water portion, so having more ambient light will help minimize the exposure difference between the two sections of the photo. You also need to consider where the sun rises and sets in your shooting location. If you want the mountains of the island in the background, for example, is the sun going to be behind you in the early part of the day or later on?
A successful split requires reasonably calm water to control the waterline on the dome. Early mornings often offer the calmest waters. Thus, you may have to compromise on the time of day to get the best overall shooting conditions. It’s difficult to analyze the display screen in bright conditions, so be sure to check the image’s histogram.
4. Add artificial light when appropriate.
When shooting in low light or just after dawn or near sunset, you will need to add artificial light from your strobes. A mistake people often make, however, is not positioning their strobes low enough. When you raise the camera to take a shot, both strobes need to be level and underwater, so first practice your shooting position and then adjust the strobes accordingly. A good rule of thumb is to place your strobes at 5 o’clock and 7 o’clock.

5. Choose your focus point.
To achieve the proper focusing, it’s usually important to focus on the underwater subject rather than the above-water one. Set the focus point on your camera to the lower portion of your frame ahead of time. If you switch from horizontal to vertical, you will need to adjust this focus point.
This rule presumes that the important subject is marine life below the surface. You might prefer the topside element and choose it as your autofocus (AF) target. Water interface and the virtual image force the focus above and below to be different, so know your camera and housing well enough to quickly adjust the position of the AF zone.
6. Use back-button focus (optional).
To achieve the best possible focusing, it is helpful to use back-button focus, so your shutter button and focus button operate independently. Normally, when you press the shutter halfway, the camera will focus, and then you fully press the shutter to take the shot. When trying to capture a quickly moving subject, however, activating the focus separately from the shutter button provides an advantage. Most mirrorless and DSLR cameras have the ability to program a button on the back of your camera to perform this task; on most cameras it is the AF-ON button.
7. Use a small aperture.
Due to the difference in focusing in air and water, splits require a high (small) aperture to enhance depth of field and get both the underwater and above-water portions of the image in focus. Ideally, focus your wide-angle lens on the virtual image in front of the dome underwater and focus to infinity above water. Depending on the amount of ambient light, I set my aperture between f/16 and f/22. The more ambient light available, the higher I can set my aperture. Increase your ISO to compensate for the high aperture. Generally, an ISO of 320-640 is preferred.
8. Use high shutter speeds.
Next, dial in the shutter speed. I tend to shoot with high shutter speeds in general, and for quickly moving subjects such as sharks and dolphins, fast shutter speeds help prevent motion blur. For slower moving subjects, you can decrease the shutter speed. Most of my shots are with shutter speeds between 1/125 and 1/250 second.
To start, your initial settings may look something like this:
f/16
ISO 320
1/160 second
9. Avoid water droplets on the dome.
Nobody wants a trail of water droplets across their dome, yielding an image that will likely be discarded. To avoid these pesky droplets, try some of these tricks: First, dunk the dome often, and check that you aren’t getting droplets all over your picture. If that doesn’t do the job, rub the dome with mask cleanser or baby shampoo, but you will need to repeat this procedure during continuous shooting. In desperate situations, some photographers have licked their domes, but using a glass dome saves me from resorting to that.
10. Be creative in postprocessing.
You want to take the best possible image in camera, of course, but postprocessing methods can greatly enhance your overall image quality. The most common thing I use is a graduated filter that allows me to darken above-water portions and lighten the underwater parts of my pictures. It is also helpful to use the spot removal tool to remove any residual water droplets.
With a little practice and the proper equipment, you will be on your way to taking striking split images. Splits can be challenging and require patience, but they certainly allow you to use your imagination and creativity.
| © Alert Diver — Q2 2018 |