AS I FLOAT IN THE SOFT DARKNESS of a flooded cave, a tunnel leading away from me catches my eye. Like a mountain trail, the passageway offers spectacular views, physical challenges, and exhilaration. As I exhale into the water, I feel a dissolution of self — a sensation common among hikers, climbers, and other adventure seekers. The landscape takes over, my mind is clear, and I am at peace. My goal as a photographer is to convey that sensation in a photo. I wouldn’t say I have mastered emoting through imagery, but I think I’m getting closer with every photo I shoot.
I would characterize myself as an intuitive photographer instead of a technical one. My processes have evolved around what looks nice on my camera’s LED screen rather than what most professionals would consider a technically excellent photo. In my defense, I learned to shoot caves on the fly. I had zero knowledge of camera settings and had never used a digital camera on land. I shot my first real photographs through an underwater housing and captured my first magazine cover using the camera’s automatic settings. I learned as I went and developed methods that differ from those of trained photographers. While I shoot with manual settings these days, I have persisted in using other nonconventional (some might say incorrect) photography techniques.
But what is right and wrong in art? I shoot for myself and my personal enjoyment. If a photo elicits an emotional response when I look at it, I consider it a success — even if the edges are soft, it has a little noise, or the focus isn’t perfectly sharp. If the image shows the viewer a glimpse of my world and how I see the caves, even better. So here is how I do everything “wrong,” just how I like it.

Step One: Eliminate Onboard Lights and Strobes
I shoot entirely with off-board video lights. Onboard lights illuminate the foreground, which can be desirable if the photographer wants to show a feature on the floor or ceiling or brightly illuminate a model’s face and equipment.
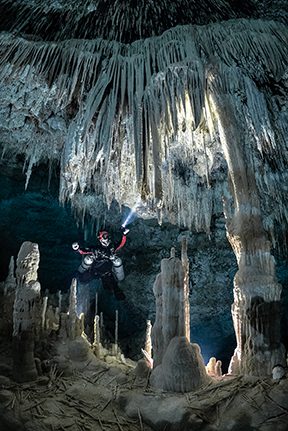
My goal in photography is not portraiture but instead a type of landscape photography featuring a diver for scale. To show the three dimensionality of the tunnels, I move all the lights forward and away from me, allowing the darkness to creep into the edges of the scene and producing a natural vignette. I essentially light the cave and models like a theatrical set.
Slave sensors and strobe(s) on the photographer’s camera can trigger off-board strobes. It’s possible to use off-board strobes in much the same way as off-board video lights, but the presence of an onboard strobe illuminates the foreground in most cases, which diminishes the sense of depth and loses the delicate dance of shadows across the scene.
The drawback of eliminating strobes is that they typically produce much more powerful light than video lights. As strobes are on only when firing, they typically allow a longer shooting time than video lights before running out of batteries. Still, I use Keldan 8M CRI96 8,000-lumen and 8XR CRI86 20,000-lumen video lights with the RC1 remote control for fine-tuning. This setup results in a darker scene than when shooting strobes, which brings me to the next piece of the puzzle.
Step Two: Use a Low-Light Camera and Push the Settings
My camera is a Sony A7S III, arguably one of the better low-light cameras of its generation. The Sony A1 would probably be a step up from my camera for photography. The A7S III is a 12-megapixel full-frame camera, so what it loses in resolution, it makes up for in dynamic range — the range of tones from the lightest lights to the darkest darks. This camera allows me to capture details in the shadows and blacks, hints of textures and shapes that give a realistic and interesting level of detail to the foreground without overlighting it.
The A7S III is capable of shooting nearly noiseless images at 12,800 ISO. At 12,800 ISO, I can typically lift the exposure of RAW photos in Lightroom to +1.00 or +1.50 without any noise, and at around +2.00 I have a tiny bit of grain that doesn’t show in 11- by 17-inch prints. I have experimented with even higher ISOs and found that I can shoot up to 20,000 ISO without distracting noise, although the level of noise acceptable in a photo is probably a matter of taste. I haven’t tried many other camera brands, but I imagine that most can tolerate an ISO push beyond what most photographers shoot. I encourage cave photographers to experiment with ISOs, break the rules a bit, and see what their cameras can handle.
Shutter speed is also important. Cave photographers attempting this style of photography should minimize their shutter speed. My go-to shutter speed is 1/30 second, which may sound crazy. Yet with proper dive skills and a stable model, I get nicely focused images with no blur. Remember, I’m not chasing fish in these photos — I have good models who will stay absolutely still for as long as I require.
Finally, I use the Nauticam Wide Angle Conversion Port (WACP1). This massive, heavy dome port results in extremely sharp 130-degree images when shot with a Sony 28-70mm kit lens. With this setup, I regularly shoot an f/4 to f/5.6 aperture and get nicely focused images with a good sense of three-dimensionality.
This combination of settings sounds unusual to most photographers, and it’s definitely not standard. But neither is the cave environment or my lighting style. These settings combined with my camera rig allow me to eliminate strobes and move the lights away from the camera, and I like how that looks.

Step Three: Light Placement
A photographer’s choice of light placement is where the artistry of this style of cave photography emerges. With settings chosen to maximize exposure, I use the placement and intensity of lights to execute my vision of the cave.
Working with a lighting assistant is the easiest and most efficient method of off-board lighting, so I recommend it to most cave photographers. Placing the lighting assistant directly behind the model with the video light pointing directly at the camera is a classic scheme that always delivers. It creates a sparkling halo effect and makes bubbles on the ceiling shine and the cave glow. A lighting assistant can also direct light on the model from above or the side depending upon the desired effect.
Having a lighting assistant means less task-loading than when placing lights yourself and reduces the chances of damaging the delicate cave environment. Remember that environmental impact is bad for the cave and causes silt, which destroys most images. It’s essential that the model, the lighting assistant, and the photographer all avoid causing silt, which is much harder than it seems.
The more difficult method of light placement is to set them at key points throughout the cave, which is time-consuming and can cause significant impact on the cave environment if done incorrectly. After a shoot, there should be zero evidence that a photographer was present. It’s essential to avoid leaving marks in the sediment or cracking delicate pieces of rock while placing and removing lights.
I prefer placing lights to using a lighting assistant, however, because I want total control over the scene. The drawback is that my shoots are not efficient. Most of the time my models are left floating and bored while I fastidiously move around up to nine lights. I can’t describe how I choose where to put the lights or determine the angles. Usually upon arriving at an interesting location, my brain goes wild, and I can see exactly where the lights belong. I use a combination of lights pointed at the lens, away from the camera, and perpendicular to the scene.
I encourage photographers using off-board lights to experiment with different effects, ask the lighting assistant to try different angles, and move around lights (with conservation in mind) within a single scene to see what looks best.
Step 4: Cave Experience and Safety
An integral part of being a successful cave photographer is surviving the experience. No one wants to have their cave photographs used in their accident analysis report, but sadly this is often the case. Until about two years ago, every Mexican cave-diving fatality I’d heard of involved cameras in some way. Cameras are distracting and task loading, and my guess is that focusing on the mechanics of taking photos led to navigational errors in most of these cases. Cave experience and safety are critical.
As a cave photographer, I would be a hypocrite to tell people not to shoot in caves. But I have more Mexican cave-diving experience than most cave divers, let alone most cave-diving photographers. I work professionally as a cave-diving instructor, cave dive nearly every day, and have lived in Mexico for 17 years. Without that level of experience, how can you safely capture amazing cave photos?
Be familiar with the cave and the area within the cave that you choose to shoot. A scouting dive will allow you to consider how you will light the scene and position your model. You can brief the shoot before the dive and even diagram your idea to make the shoot effective and efficient. Familiarity with the shooting location is also vital if you become disoriented during the shoot. All divers in the team should be able to recognize where they are and understand how to get out at any point in the dive.
Bring a safety diver on your shoots, especially if you are not a full-time cave diver. Of course, you should regularly check your breathing gas, maintain your sense of awareness and direction relative to the line, and keep an eye on the environment to avoid breaking delicate formations or marring the sediment. But everyone can make mistakes, and it’s helpful to have a diver whose sole responsibility is ensuring that the photographer and the model stay safe and don’t damage the environment.
Remember that cave-diving protocols and techniques come first. Carrying a task-loading, distracting tool into the cave does not justify breaking standard cave-diving protocols. Divers should be more strict about cave safety when shooting, not less so. Photography does not justify breaking visual with the guideline, diving past your turn pressure, or failing to place a guideline at all.
In addition to observing all these standard safety protocols, I always place a personal marker on the cave line indicating the exit direction to reduce the chance of disorientation. Much to the dismay of some magazine editors, I try to keep the cave line in all my photographs and refuse to edit it out — I always want to show safe cave-diving practices.
Execute Your Unique Vision
Mexican caves are a photographic wonderland filled with infinitely clear water and brimming with delicate formations. With zero natural light, photographers have unlimited creative control. Achieving emotional and enticing cave images requires creativity and flexibility, whatever your methods.
Learning to photograph this challenging environment can be frustrating, but the effort is justified when you can pour your heart out through your lens and get others to see your unique vision of the world. AD
© Alert Diver — Q2 2023