Flexibility is not just part of your exercise warm-up routine. It is an independent component of a balanced fitness program that can have a direct impact on scuba diving performance as well as daily living. A healthy range of motion (ROM), also known as good flexibility, at each of your joints allows putting on gear, entries and exits to be executed with greater ease. Flexibility also aids in maneuvering around a rocking boat without falling. Lower back pain may even be prevented or decreased by achieving a healthy ROM at each joint. It is important to note, though, that a greater ROM is not always better; excessive flexibility, known as hypermobility, can predispose an individual to injury.
The National Council on Strength and Fitness recommends using a battery of field assessments to evaluate your flexibility. Since flexibility is joint specific, it is important to evaluate each area of the body bilaterally (right and left). The tests described below focus on four primary areas (shoulder, back, hip and leg) and assess more than 20 different aggregate muscle groups. As you work through the exercises, make a yes/no note of whether you were able to complete it; this will help you gain an overall picture of where your ROM stands.
Don’t be surprised if you have a greater ROM on the dominant side of your body. This is normal; we tend to use our dominant side more frequently. However, it is important to try to balance the ROM through a flexibility training routine. If flexibility is not addressed in your fitness program, your ROM may actually decrease due to an increase in muscle mass. Regularly mobilizing each joint through a full ROM and properly integrating a flexibility routine into your workout will improve your overall ROM.
Note: To avoid an increased risk of decompression sickness, DAN® recommends that divers avoid strenuous exercise for 24 hours after making a dive. Always make sure that you have medical clearance to exercise during your annual physical exam or following any changes in your state of health.
Shoulder Flexion Test
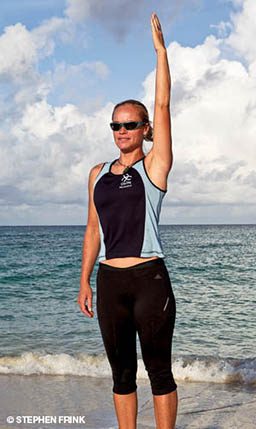
Healthy ROM: 180° (upper arm in line with ear)
- Stand with arms at your sides and palms facing your body.
- Raise one arm straight forward and upward as far as you can reach without flexing (bending) your elbow.
- Repeat on opposite side.
Shoulder Abduction Test
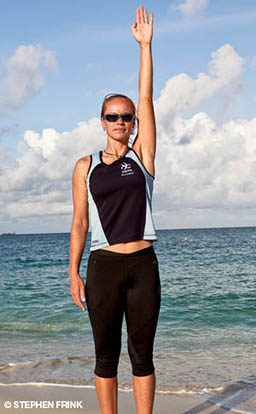
Healthy ROM: 180° (wrist directly above the shoulder)
- Stand with arms at your sides and palms facing forward.
- Move arm away from the body (as if doing a jumping jack) while keeping arm straight and palm forward.
- Repeat on opposite side.
Shoulder Capsule Back Scratch Test
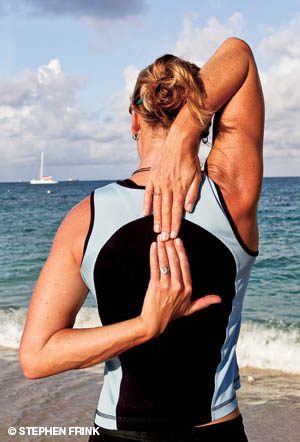
Healthy ROM: Touching fingertips. Do NOT try to exceed this ROM by gripping fingertips.
- Stand with your arms at your sides.
- Flex shoulder (same as during shoulder flexion test) and flex (bend) at the elbow.
- Internally rotate your opposite shoulder and flex at the elbow behind your back.
- Repeat on the opposite side.
Back Flexion Test
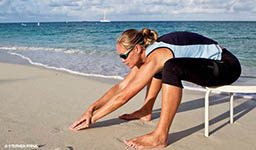
Healthy ROM: When your shoulders are next to your knees.
- Sit on a chair or box that is about knee level so your thighs are parallel to the ground.
- Your knees should be spread slightly wider than your shoulders.
- Reach downward between your legs, bringing your shoulders as close to your knees as possible.
Back Extension
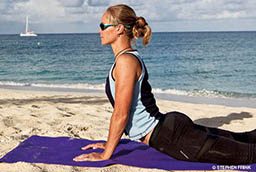
Healthy ROM: When you can fully extend your arms while hips remain in contact with the floor. Hip departure from the floor is an indication of tight abdominals or hip flexors.
- Do NOT attempt this assessment if you have a history of back problems.
- Lay in prone position (face down), preferably on a mat or carpeted surface for comfort.
- Place your hands directly under your shoulders and fully extend your arms while keeping your pelvis (hips) in contact with the floor.
Back Lateral Flexion Test
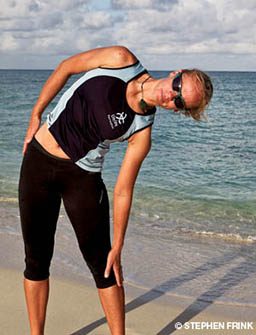
Healthy ROM: When your palm reaches the side of the knee.
- Stand upright with palms touching your thighs.
- Lean to one side as far as possible, sliding your hand down your leg without flexing (bending) your knee or rotating your trunk.
Hip Flexion Test

Tight hip flexors may cause an anterior pelvic tilt, which may contribute to lower back pain.
Healthy ROM: When you can bring your thigh halfway to your chest.
- Lie in supine position (on back) and bend one leg, pulling knee as close to the chest as possible without lifting opposite leg off the mat.
- Repeat on opposite side.
Hip Extension Test (Thomas Test)
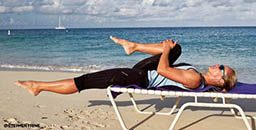
Tight hip extensors may cause a posterior pelvic tilt (buttocks tucked under), which may contribute to lower back pain.
Healthy ROM: When the back of thigh of the released leg rests on the table.
- Lie in supine position on a STURDY table or bench and pull both knees to your chest.
- Release one leg, extending it off the edge of the table or bench.
- Repeat on opposite side.
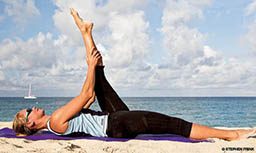
Knee Extension Test
Healthy ROM: When you can hold hip at 90° of flexion while the knee remains fully extended (straight).
- Lie in supine position and flex one leg, bringing your knee towards your chest.
- Extend (straighten) leg upward without lifting the opposing leg from the floor.
- Repeat on opposite side.
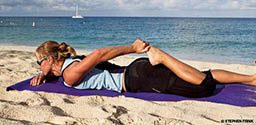
Knee Flexion Test
Healthy ROM: When you can bring your heel within 2 inches of your gluteals.
- Lie in prone position (on belly) and flex (bend) one knee.
- Hold ankle with hand on the same side, pulling your heal closer to your gluteals (buttocks).
- Repeat on opposite side.
Safety Tips
- Always follow the recommendations of your physician (especially if a joint has sustained a prior injury).
- Warm up muscles prior to assessment.
- All assessments should be completed in a slow, controlled manner (no bouncing).
- Do not exceed the ROM identified as healthy for each assessment.
- No one should assist you in completing the assessments.
- Stop if you feel discomfort.
© Alert Diver — Q4 Fall 2010