Suspension training adds instability to make every exercise a total body workout. Since a stable core is essential for all in-water movements, these core-blasting exercises are perfect for scuba divers. For example, when finning, the muscles that flex and extend your hips also pull on your pelvic bones. Weak pelvic stabilizers can lead to lower-back pain following extensive finning.
Safe and effective for professional athletes, Navy SEALs and weekend warriors of all ages and fitness levels, suspension training consists of bodyweight exercises using nylon straps attached to a doorjamb, tree limb or other stable overhead attachment point. It’s easy to adjust the difficulty of the exercises by simply moving the feet forward or backward or by standing on one foot rather than two. The most popular suspension system is from TRX®, but less costly alternatives are also available. The lightweight nylon straps are travel-friendly, making it possible to work out just about anywhere — no weights or gym required.
Getting Started
With each exercise, perform as many slow, controlled repetitions as possible for 30 seconds, then take a 10-second break. Repeat until you complete three sets of each. (If you’re not quite ready for three sets, start with one and work up to two or three.)
Always listen to your body: The goal is to slowly overload your muscles to achieve maximum benefits while minimizing the risk of injury. Once the exercises start to feel easy, increase your angle slightly to make them more challenging, but keep movements controlled. Remember to breathe — as with scuba, never hold your breath (it causes a spike in blood pressure and could lead to fainting).
The core is the primary target of all these exercises; all other muscles are secondary targets. Stop as soon as you lose core stability (sagging or wiggling); regain your form, and then continue if possible.
Suspension Squat
Squats are important for divers as they help develop muscles that facilitate standing up in scuba gear. The suspension squat is a versatile squat exercise because minor variations can be applied to either support or challenge you. Newbies benefit from the ability to truly sit back into the squat position, taking undue stress off the knees. Athletes can safely progress to a deeper squat with a greater range of motion and eventually to a one-legged (pistol) squat.
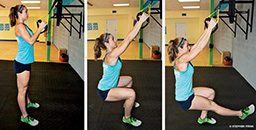
- Hold the handles at chest height with your arms at your sides and your elbows bent. Your feet should be slightly wider than shoulder width and weight should be in the heels.
- Slowly sit back and down as if sitting into a chair, keeping your weight in your heels with your chest and head slightly up.
- Your knees should stay over your toes, but don’t look down to check. Ask someone, record yourself, or look in a mirror.
- Descend as low as is comfortable or until you feel your tailbone swing under. Everyone has a different initial depth to their squat. You will gradually be able to go deeper into your squat as you progress. Thighs parallel to the floor is a good benchmark, but more or less is OK depending on your fitness level.
Challenges:
- Increase the depth of your squat.
- Narrow your stance to challenge balance.
- Once you’ve gotten to the point where your feet are touching, perform the full squat with one leg raised in front of you.
Supported Pull-Ups
These exercises target the core as well as the upper-body musculature used when climbing a ladder in scuba gear.
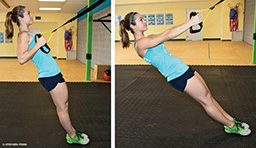
- Hold the handles close to your chest, and lean back as far as you feel comfortable. Move your feet to the appropriate location for your preferred resistance.
- Fully extend your arms while maintaining a stable core.
- Using your arms, pull yourself back to the starting position.
Tips:
- A stance slightly wider than your shoulders is easier than a narrow foot position.
- The more vertical your body, the easier the exercise; the more horizontal your body, the more challenging the exercise.
- If your core begins to sag, stop and reposition yourself. You may need to adjust your foot position.
Chest Press
Think of this exercise more as a moving plank than a chest press because core stability is the primary focus. The chest press component is important to balance the back muscles worked during the pull-ups.
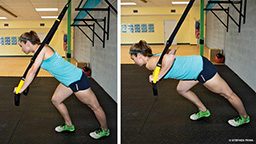
- Hold the handles below chest level, with your shoulders down.
- Step one leg into a lunge position and lean forward, transitioning your weight to your front leg and hands. As you progress, you will be able to put more weight on your hands and ultimately complete the movement in more of a push-up position than a lunge.
- Fully extend your arms while maintaining a stable core.
Tip: Keep your shoulders down (away from your ears), and hold in your ribs by keeping your abdominal muscles engaged throughout the movement.
Bridge
The bridge targets the posterior chain muscles (e.g., lower back, glutes, hamstring and calves). Strong hip and back extensors will help divers glide comfortably through the water. These areas are frequently neglected during training (not to mention in daily living).
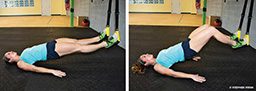
- Set up your suspension straps so the handles hang just below your knee caps.
- Sit down, and using your hands to help, place your heels into the straps with the soles of your feet on the handles.
- Lay back, and extend your legs.
- Extend through your hips, raising your lower back as high as possible.
- Relax, and lower your body to the ground.
Tips:
- The straps should hang directly below the anchor point if possible.
- Maintain a tight core.
Challenge:
While your body is elevated, flex your knees to bring your heels toward your buttocks. This will increase use of the hamstrings.
DAN Note: To avoid an increased risk of decompression sickness, DAN recommends that divers avoid strenuous exercise for 24 hours after making a dive. During your annual physical exam or following any changes in your health status, consult your physician to ensure you have medical clearance to dive.
© Alert Diver — Q3 Summer 2015