Divers venture into a hostile environment with no breathable air and potentially extreme temperatures. To survive these conditions, dive equipment provides life support and insulates the body, helping regulate its temperature.
Water is more than 800 times denser than air and has a specific heat capacity four times greater. It is also much more efficient at carrying heat away from an object in contact with it. What this means for divers is that water absorbs and transfers heat from the body more quickly and efficiently than air does.
Exposure suits protect divers from abrasion and heat loss. Recreational diver exposure suits range from lightweight elastic nylon suits and non-neoprene, wetsuit-like garments to traditional wetsuits and drysuits. The water temperature will influence the proper suit choice to maintain a diver’s normal body temperature.
With a wetsuit, the body warms gases trapped in the material and a resident layer of water. Drysuits, however, encapsulate the diver in a gas-tight barrier. An undergarment traps gas in its fiber matrix to provide insulation. A drysuit provides more effective insulation by preventing water from reaching the diver’s skin, unless the suit leaks.
If a leak happens, assess where you are getting wet: Is it around the neck and shoulders, the left upper arm, the lower sleeves, the chest and stomach, or the thighs? Are you sloshing in your boots? Water travels, so wetness in one area may emanate from somewhere else.
Pressure Testing
The first step for finding leaks is to pressure test the drysuit both right side out and inside out. A simple way to test right side out is to use a plastic mixing bowl or food container and vinyl electrical tape to dam the opening of the neck seal. Use something to block the wrist seals unless gloves are attached (soda cans or teardrop-shaped bottles with caps and the labels removed work best). Zip up the suit, close the exhaust valve, and attach a low-pressure inflator hose to fill the suit until taut.
Check for leaks using a 1:100 dilution of detergent solution. Spray down the front and back of the suit with a spray bottle or garden sprayer and look for bubble formation. Be sure to spray the zipper, inflator and exhaust valves, seals, seams, boots, and gloves too. Use a grease pencil to mark where the suit leaks, and copy the marks on the inside for repair. Rinse the suit with fresh water, and let it dry thoroughly.
Testing the suit inside out puts the inflator access on the inside and requires fabricating a seal dam with an inflator. A BCD inflator or air tool fitting can be adapted for this purpose. Turn the suit inside out and pass the wrist seal blocks into the sleeves and the neck dam inside the suit. Reach in through the neck to zip the suit. Pass the dam through the neck seal to bring the inflator outside. Make sure everything is sealed, and inflate the suit to check for leaks as above.

Valves
If you find leaks at the inflator, exhaust, or P-valve, check if they are loose. It’s likely the exhaust if your upper left arm gets wet or the inflator if your chest gets wet. It’s a good idea to check valve tightness before dives. Methods for tightening valves differ between manufacturers, so be sure to use the appropriate technique.
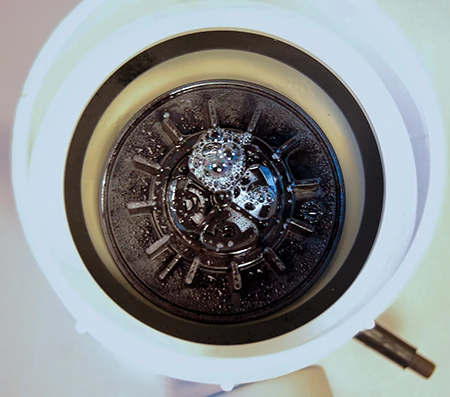
Valves need regular service. Inflator valves use O-rings that need periodic replacement. Worn O-rings can allow water into the suit or cause a free-flow, and debris on O-rings can cause valve sticking. Connect the valve to an LP hose, turn on the air, and immerse the valve in water or spray it with a 1:100 liquid detergent solution. Look for bubbling, but don’t press the inflator button while the valve is submerged.
Bubbling may indicate debris in the valve. To remove debris, disconnect the valve from the hose. Soak the valve in a warm, diluted detergent solution and work the button while submerged. Press the button and flush fresh water through the valve. Attach an LP hose and purge air through the valve until it’s dry. While the valve is attached to the LP hose, again submerge it in water and check for bubbling. If bubbling persists, then service by a trained technician or replacement is necessary.
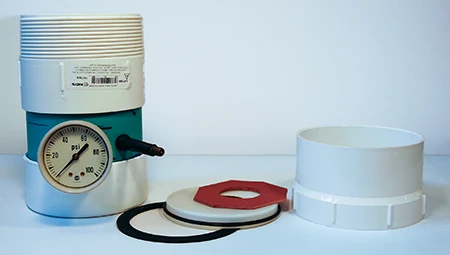
An exhaust valve failure is often due to debris. Soak the valve in a warm, diluted detergent solution. Set it to the easiest exhaust, and flush water through the valve, pressing the purge while flushing. There may also be a filter that you should flush of debris. You can pressure test a valve using a pressure chamber. If bubbles occur, then further service by a trained technician or replacement is necessary.
To test an exhaust valve’s cracking pressure, make a simple mouthpiece adapter for a manometer. The readings should range from 0.4 millibars (0.006 psi) in the open position to 25 millibars (0.36 psi) in the closed position.
P-valves can also be a source of leaks. First, ask yourself if the wetness is from water or urine. If it is water, then a loose bulkhead may be the fault. If it is urine, then it could be a poorly applied catheter or a compromised valve. Proper maintenance can obviate the latter. Cracks in tubing and connectors as well as faulty balancing chamber valves can cause leaks.
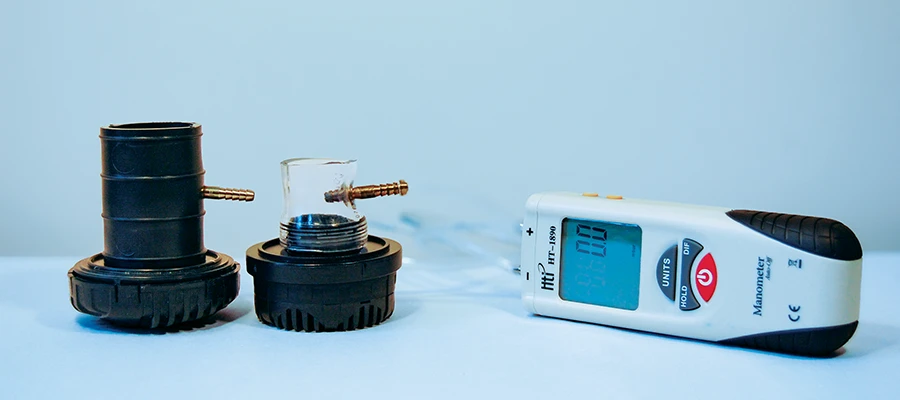
If you suspect leaks in the P-valve, perform a pressure test by blocking the valve exit while applying positive pressure (orally or with a syringe) through the catheter adapter. Spray the valve, tubing, and fittings with the detergent solution or submerge them in water, and watch for bubbles. Address the source of the bubbles by cleaning, sealing, or replacing the faulty component. Rebuild kits may be available from the manufacturer.
To test the exit mushroom valve integrity, unblock the outlet, and then block the balance valve with your thumb. If air is drawn while applying negative pressure through the catheter adapter, the valve will need to be cleaned or replaced.
Seals
Seals are obvious culprits for why you end up wet. Latex and neoprene seals degrade and lose their elasticity over time. Oxygen, ultraviolet (UV) rays, ozone, and oils are not their friends. Seals glued to the suit require removal and replacement. Silicone seals resist UV, ozone, and chemical degradation, and they are easier to use and seal but can tear more easily than latex and are more expensive.
Modular quick-change seal systems allow quick removal and replacement, making it easy to do in the field. Most suits can be retrofitted with replaceable seal systems. You can quickly recover the initial installation cost by replacing seals yourself.
A quick field test for holes or tears in a seal is to pinch, tape, or bottle the openings, and then pour water into the seal and look for drips. Alternatively, you can twist a sleeve to create positive pressure inside the seal and then apply a diluted detergent solution or submerge the seal in water and look for bubbles. The same method works for leaks in arms and legs.
You can make field repairs on latex seals using latex seal scraps and a latex adhesive. Duct tape will even work temporarily in a pinch. You can fix neoprene seals with neoprene cement, but there is no product to repair silicone seals.
Aquaseal is a urethane sealer for repairing holes in suits and leaks in seams. It is flexible but not elastic, impeding the stretch that seals need. For a cleaner look, make suit repairs on the inside rather than the outside. You can find good discussions of suit repair and seal replacement online.
Gloves
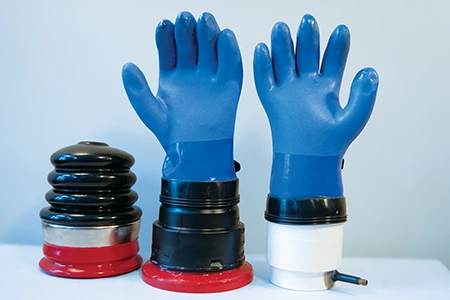
Test your gloves off the suit by filling them with water and looking for leaks. If you seal the open end and roll it up to create pressure, you can then spray or immerse a glove to look for bubbles. Pressure-testing devices for gloves are commercially available, or you can make your own.
To repair gloves, mark the areas that need repair and turn them inside out. Allow them to dry thoroughly if you tested them wet. Apply Aquaseal to the areas where you found leaks, and allow it to cure. Do the same on the outside, and then pressure test them again.
Good Practices
Good general maintenance can add years to a drysuit’s lifespan. Zipper lubrication after diving is crucial. Use wax for brass or silicone grease for plastic zippers. Trimming loose threads that develop on brass zippers and then gently heat sealing with a soldering iron ensures a tight seal. Clean the zipper and teeth occasionally with detergent and a soft brush.
Wash latex seals with detergent, and then apply a protectant. Wash the outside of the suit to remove salt and dirt and the inside to deodorize. Flush P-valves to disinfect them and prevent urea crystallization and bacterial growth that can compromise valve function or cause infection.
© Alert Diver – Q2 2026