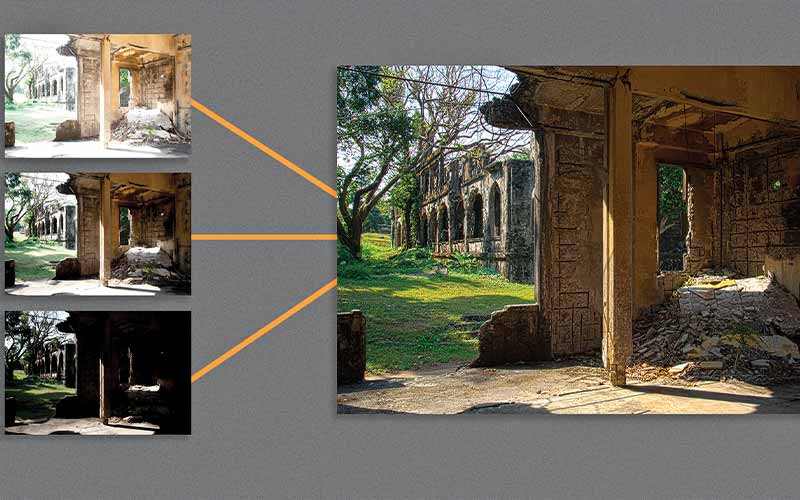
High dynamic range (HDR) is a clever digital process that will allow you to generate exceptional detail in still photos by combining the best elements from multiple shots into a single image. Just as a composer blends a symphony of tones into a final musical score, HDR software tools allow a photographer to handpick the best elements of multiple photos — the brightest highlight of one and the deepest shadow of another — and blend them for maximum artistic effect.
Creating a true HDR image is a two-step process of merging a series of three or more exposures into a single image (thereby allowing you to extend the dynamic range, hence the name) and then tone mapping this range into a single, usable file. Properly exposed, the range of a single raw file can offer an amazing depth of tonal values to process. Unfortunately, even a raw file isn’t capable of capturing the full range of highlight, mid-tone and shadow regions that the human eye can see, which is why the HDR process draws details from multiple exposures.
HDR is a relatively new technique and is accessible in Adobe Photoshop as well as third-party plug-ins and stand-alone applications capable of tone mapping. To create a true HDR image, you need to capture multiple exposures, ideally one f-stop apart. Three or more exposures work best. They should include an average exposure, one exposure that is a stop over and one exposure that is a stop under. Five or more exposures work even better if you have the time and a suitable subject.
Hot Tip: Shoot the exposure brackets on aperture priority, if possible, as it is important to maintain the same relative depth of field by using the same aperture for each.
Merging Exposures in Adobe Photoshop
Merging a variety of exposures works best from raw files, but you can use TIFFs, JPEGs and PSDs. If you need to make any changes to your images such as changing the white balance, make the exact same change to all of the images before merging.
To access the “Merge to HDR” command in Adobe Bridge, go to Tools >Photoshop >Merge to HDR. In Photoshop CS2, CS3 and CS4, go to File >Automate >Merge to HDR. From Lightroom 2 or 3, choose Photo >Edit In >Merge to HDR in Photoshop.
Your first encounter with the HDR controls will seem somewhat out of whack. In Photoshop CS2, CS3 and CS4, the “Merge to HDR” user interface displays images dark and flat, shows a 32-bit scale histogram and a slider for you to select a “white point” and, finally, gives you options to uncheck unwanted exposures as well as the option to continue in 32-bit, 16-bit or 8-bit. It sounds confusing, to say the least. The process is actually simple.
Move the slider under the white-point histogram to an acceptable point of visual highlight detail, choose 16-bit to process, and then select OK. Photoshop will analyze all of your exposures and will then give you four HDR conversion (tone-mapping) choices. Each choice will have some very powerful controls, so take it easy using the sliders.
Hot Tip: The once choice that will give you more control overall is “Local Adaptation.” It’s the only control by which you can actually establish your toning curve using the curve adjustment points along with the Radius and Threshold sliders to generate personalized HDR tone mapping.
Something to keep in mind is that “Merging to HDR” is the first step in the process; you may also want to create additional enhancements, color changes and tonal adjustments after the initial merge. But when you are first working in HDR, view each “Method” option —”Equalize Histogram,” “Highlight Compression,” “Exposure” and “Gamma” — before you choose “Local Adaptation.” Each image will have its own idiosyncrasies, and unless you are working for a specific look, each of these options can serve a purpose in the initial process.
There is a variety of HDR software from which to choose, including plug-ins for Photoshop. The HDR software I prefer is Photomatix Pro from hdrsoft. The Photomatix user interface for merging multiple exposures takes on a different process using the “Generate HDR” image control, and their “Tone-Mapping” controls are very user-friendly. In addition to their stand-alone software interface, they also offer a Photomatix plug-in for Photoshop. After you generate your “Merge to HDR” in Photoshop, the Photomatix plug-in allows more advanced tone-mapping features in your 16-bit file.
Faux HDR: Tone Mapping a Single Image
Tone mapping can also be used to bring out details in a single image in a process I call “Faux HDR.” Not every image is a candidate for this type of processing, however. Look for a raw image with an average exposure (one with a nicely balanced histogram) and, if possible, one with a toe to the “mountain” on each side. In Adobe Lightroom 2 or 3 or Photoshop CS3 and CS4, you can use the following controls to generate your Faux HDR image enhancement, a process that I call “Move It, Move It.” Again, working from a raw file will yield the best results, although you can also use these features on TIFFs and JPEGs.
Open your image in Adobe Camera raw or choose the Develop module in Lightroom. In the basic controls, set your white balance and exposure, and then use the following three sliders to generate your Faux HDR look: Recovery, Fill Light and Blacks.
How far to move these sliders will depend on the look you want to achieve, but a good starting point will be to move each slider all the way to 100 percent, and then back off as needed.
Here are the basics of why this works:
The Recovery slider will reveal highlight detail that is hidden within the image.
The Fill Light slider will reveal shadow and mid-tone detail that is hidden within the image.
The Black slider will add a threshold of contrast back into the image.
Using the right combination of these sliders for a particular image will require examining edge details at the 100 percent viewing ratio to minimize a halo likely surrounding some edges. These can be blended away usually by reducing the Fill Light slider or some combination of all three.
After applying these controls, finish the image with refinements via the Clarity and Vibrance sliders.
The shark image below may seem hopelessly overexposed but with the power of raw processing in Faux HDR, a more detailed image results.
Some underwater subjects are not suitable for true HDR. Imagine shooting a subject like these sharks on a tripod with multiple bracketed exposures with the same aperture.
It won’t happen. As an alternative, Faux HDR may be the best we can do. But there is more to a dive holiday than the photo-ops beneath the sea, and having the various permutations of HDR technology in your bag of tricks may deliver a topside image otherwise impossible.
HDR Shooting Tips
If you plan to create a true HDR image:
• Use a tripod with a remote shutter-release button.
• Set your Custom camera setting for Mirror Lock Up.
• Set your Custom camera setting for multiple exposures bracketing at 1-stop increments.
• Use aperture priority, if possible.
• Try shooting HDR panoramas.
© Alert Diver — Q2 Spring 2010