I’ve been an underwater shooter since 1980, and over the years I’ve had opportunities to take pictures in many of the world’s best marine environments. After all I’ve experienced on the water planet, my passion and focus have always come back to shooting in the open sea. Blue-water photography typically takes place in water so deep you never see the bottom. Much of the time your environment is a huge, static void where you drift with the currents, waiting for subjects to materialize out of a monochrome background. But when things do happen, it can be absolutely mind-blowing and is where much of the cutting edge of underwater photography is occurring.
Open-ocean environments are found far offshore, but they also exist just beyond the “drop” of a coral reef or the outer edge of a kelp forest. Blue-water photography isn’t limited to blue water either; the deep green in places like Alaska and Canada can create the same opportunities that exist in tropical and temperate climates. Many of the subjects you can find in the open sea, or pelagic zone, are different from those found in inshore environments. They can be fleeting and ephemeral, coming and going unpredictably, and may not be seen again in the same area for many years.
Blue-water photography has exploded in recent years. The chance to photograph animals and behaviors never before captured on film is an allure some just can’t resist. In addition to the aesthetic appeal, images might even represent a new discovery. In 1988, off the Los Coronados Islands of Baja California, Howard Hall recorded spectacular footage of a swarm of huge, black jellyfish. These jellyfish, Chrysaora achlyos, had never been filmed before and were virtually unknown to science. National Geographic’s prolific shooter Brian Skerry spent a lot of time early in his career drifting in the open water off the Bahamas. That effort paid off with the first-ever shots of a healthy, living oarfish. Skerry credits those images as extremely important in the progression of his early career.
Today divers and dive operators are much more aware of subjects that may appear during travel over deep water on the way to a dive site. Captains are more willing to stop for dolphins or other animals and let clients in for a photo session. Specialty ecotours offer chances to shoot open-water subjects like the sardine run off South Africa, billfish feeding on bait balls and humpback whale encounters. But blue-water photography is not for everyone. In fact, it’s a lot like gambling. An underwater photographer has to be willing to accept the possibility of some lost time before a big payoff. My blue-water partner, Randy Morse, and I have an unenviable record of six days in a row in his 20-foot skiff without firing a single frame. That’s six 10-hour days of running over miles of open ocean without ever finding a subject to work with!
Subjects That Float
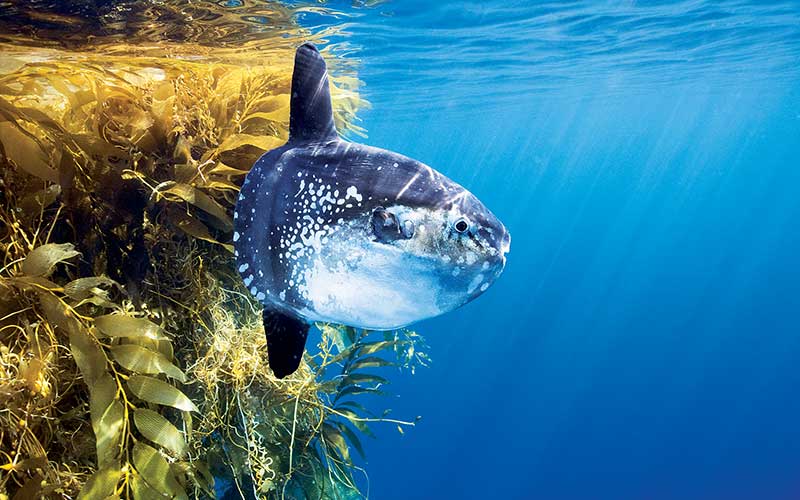
Anything that floats can attract life as it drifts on the open sea. Rafts of marine plants such as kelp paddies off the Pacific coast and sargassum in the tropics can sustain a food chain. Even man-made objects attract life; my favorite example is a drifting computer monitor our film crew found on a shoot in the Azores a couple of years ago. Once microscopic organisms start to grow on a drifting object, the chain of life appears, from algae to baitfish on up the chain to big predators. I have spent many days off the coast of San Diego, Calif., my home waters, drifting amid kelp paddies. The ocean sunfish, Mola mola, is often found here waiting to be cleaned by halfmoon fish.
For drifting algae rafts, I use a 17-40mm zoom lens on my Canon full-frame digital SLR so I can zoom according to the subject. I like to use fill flash from two strobes to give some “pop” to the animals, referencing the kelp. One benefit of shooting near the surface in a blue-water environment is the abundant ambient light. The art of blending ambient and flash to make an image look natural is learned only through significant trial and error. I try not to override the ambient light with flash, which can make an image appear “hot” or overlit. Animals that generally swim slowly like the mola mola can easily be stopped at a 1/125 of a second sync speed with fill flash.
Zooplankton
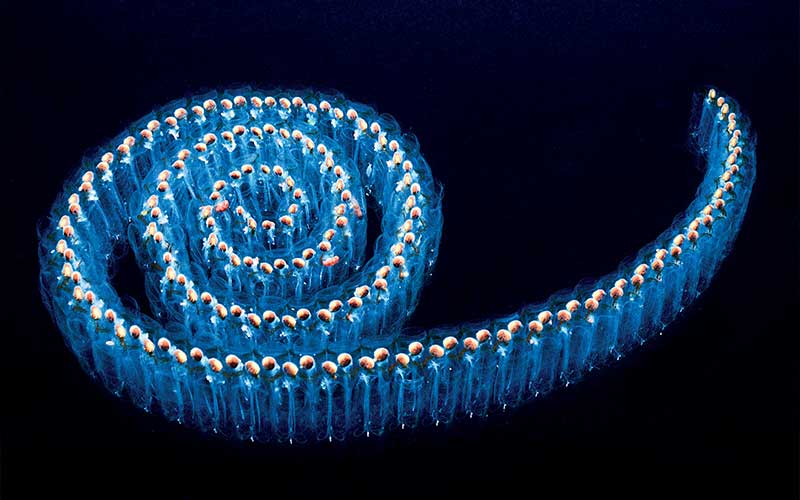
Gelatinous zooplankton such as jellies, ctenophores and salp chains are examples of plankton you can find in the open sea. Because these animals tend to be medium sized to small, lenses with macro capabilities are best. When isolating one animal, blasting with all the light you can generate while using small apertures will get you that beautifully lit “creature from outer space” look against a jet-black background.
Zooplankton tend to absorb light. I find I simply can’t pound some of these subjects with enough light, especially in macro situations. In wide-angle opportunities with the bigger jellies, you can bring in the ambient light and back off the flash output.
Autofocus does not always work when photographing gelatinous creatures; some of these animals are so translucent the autofocus can’t efficiently find them. To shoot these animals, I like to prefocus and then move in and out of focus with my own movements. Using focus lock on the housing or a manual focus gear helps with this technique.
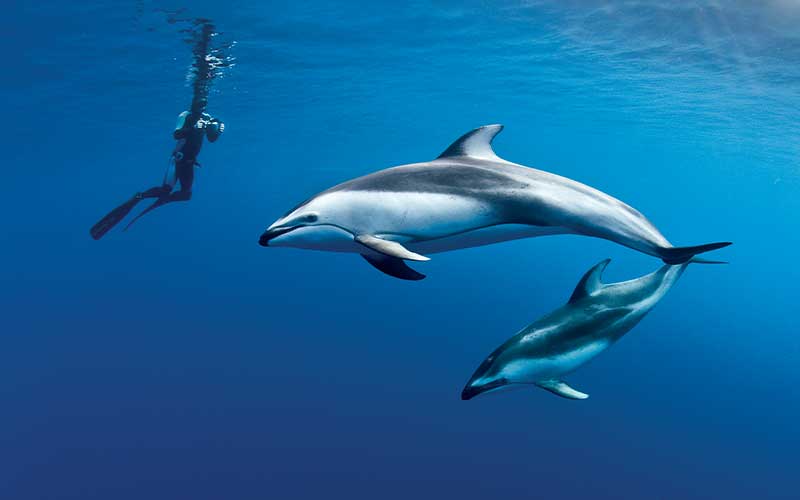
Sharks and Other Big Animals
There may be nothing more exciting than facing an open-water shark as it swims up to your lens for the “money shot.” When shooting sharks close to the surface, you may have quite a bit of illumination from the sun. Yet I like flash fill for sharks and other medium-sized animals, especially when the mouth and teeth are in the shadow of their sunlit body. Fill light directed at the underside is important to bring contrast and drama to the photo. For whales and other large marine animals, particularly those to which I’m not likely to get close enough for effective strobe work, I prefer a streamlined available-light camera system to minimize water resistance.
If an animal gives you multiple passes, you can experiment with different “looks.” One I like is shooting straight down to isolate the animal against the blue background. Be careful not to point the lens at too much of an upward angle toward the surface, as you may blow out highlights. This is a common problem when shooting close to the surface in open water.
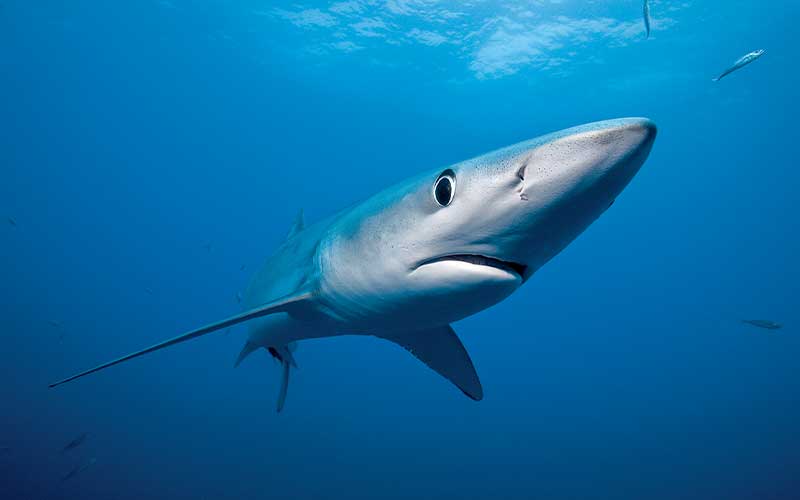
I like to shoot fast-moving open-water animals on shutter-priority automatic exposure so I always know I’ve chosen a shutter speed fast enough to stop the animal. I find I need at least 1/320 to stop speeding dolphins, for example. I will shoot on manual if I know I am going to get lots of opportunities, but I prefer to forget about settings when the animal is travelling through many exposure zones in the water column. After years of trial and error, I find this yields the highest percentage of “keepers.”
Bait Balls
At the top of the blue-water difficulty scale is joining groups of predators hitting baitfish. Predators and prey move extremely quickly, challenging both your diving and photography skills. Shutter speed, ISO choice and avoiding excessive backlight become critical. Many of what might have been my “greatest shots ever taken” were lost due to getting backlit.
It’s easy to lose detail when the sun is behind your subject; its rays illuminate suspended scales and particulates in the water. In addition, the sun will almost always overpower our relatively puny strobes. Flare can also degrade an image. Almost all underwater camera systems can get flare at certain angles to the sun, hideously revealed as portions of the dome or lens reflected in the image.
When shooting bait balls, every single flaw in your camera system and diving technique will be exposed. Such work is often best done freediving or with a small pony bottle, especially when the fish are moving fast; chasing a bait ball might involve getting in and out of a boat 20 times.
If you are shooting with flashes in a bait-ball situation, remember to back off the strobes. Bait fishes and predators like tuna are extremely shiny and will easily get “fried” from too much light. I find that in fast-moving bait-ball action I need a minimum of 1/320 to stop the action when shooting exclusively in ambient light. Of course, ISOs must be adjusted to accommodate that high shutter speed. Many dome and lens combinations can suffer from lost sharpness at image corners unless you shoot an f-stop of 5.6 or higher. This may not be a problem, though, as blue-water subjects tend not to have significant detail in the corners.
Preparation
A photographer reading a book below decks while waiting for an opportunity to shoot will probably see the day’s best images on his buddy’s screen later that evening. Blue-water opportunities are usually initiated and ended very quickly. There may be just enough time to put on freediving gear and jump in. Luck favors the prepared, and the photographer wearing a wetsuit with gear at the ready is the one who will most likely get the shot.
Safety
Blue-water photography is for the advanced underwater shooter. You must be completely comfortable in the open sea to get good images. A constant awareness of your location in the water column, your depth and your proximity to the boat is imperative. While taking pictures in an environment with nothing to reference presents many challenges to the shooter, the crew on the surface face a challenge as well: keeping track of divers. Changing surface conditions can make this difficult. Most large liveaboards are unlikely to allow scuba divers in the water over the abyss, though they may occasionally allow freedivers since they are somewhat easier to track.
Every blue-water photographer should carry a safety sausage, a whistle or air horn, a heavy-duty flasher and a personal emergency position-indicating radio beacon (EPIRB). A wrist lanyard to secure your camera equipment is also crucial; watching your fumbled housing dropping into unfathomable depths makes for a very bad day indeed.
© Alert Diver — Q3 Summer 2011