More than anything else, it takes the passion and ingenuity of talented, globetrotting photographers to push the limits and expand the frontiers of underwater photography. Today’s shooters know that to distinguish themselves in this field requires courageous commitment to their own special view of the underwater world.
Out of this passion and ingenuity comes the development of new methods and new equipment that allow the photographers’ visions to be realized. In this special edition of “Photo Techniques,” Ethan Daniels discovers the science and art of capturing the fluorescence of an exotic coral reef, while Keri Wilk describes the philosophy and methods of using targeted and directional light underwater, and Alex Mustard reflects on the advantages of polecams in unique imaging scenarios. Each of these techniques expands the shooter’s creative aesthetic and allows us to see something new in underwater photography — something that might otherwise be impossible to see.
Velvet Elvis: Photographing Fluorescence Underwater
Text and Photos by Ethan Daniels
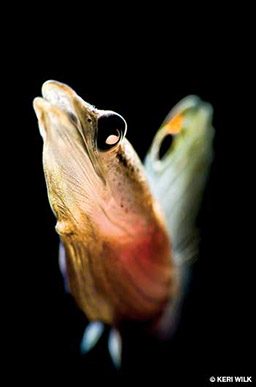
Warm liquid shadows enveloped me as I descended into a dark void along one of Buyat Bay’s many reefs. This was not to be a typical Indonesian night dive. My dive buddy, marine biologist Geoff Cook, flipped on his torch to reveal a slope of hard and soft coral colonies with polyps extended to feed on nocturnal plankton. A moment later, we both slipped orange shades over our masks. Then, positioning a filter over the torch’s bright white beam, Cook adapted the lighting to reveal previously invisible fluorescent emissions from reef creatures. Voila! The world in front of us became intensely different and alien. Amid the inky darkness, various hues of neon yellows, greens, oranges and reds glowed under the deep blue wavelengths of light emanating from Cook’s torch. The scene’s colors faintly reminded me of a very hip velvet Elvis painting that used to adorn my college apartment’s wall, surreally glowing under ultraviolet light.
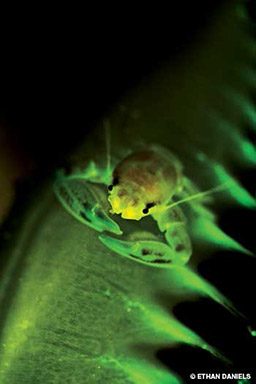
Reef fluorescence occurs when short wavelengths of light — i.e., blues — are absorbed by marine animals and re-emitted at longer wavelengths — greens, yellows or reds. So, in essence, the animals are not reflecting light, as is normal, but producing it. Fluorescence may play more of a role in color underwater than in terrestrial ecosystems because the spectrum of emitted light contrasts with the predominantly blue wavelengths that reach deepest in water.
During the day, fluorescence occurs but is overwhelmed by ambient sunlight. Once the sun goes down, however, organisms’ fluorescent proteins can be “excited” by shining an intense ultraviolet, blue or green light on them. To capture the otherworldly colors radiating from the surrounding reef, I used specially designed excitation filters manufactured by NightSea Inc. The filters were strapped onto the front of my two strobes to convert white light into the blue light that stimulates fluorescence. I used an orange filter on the front of my macro lens to block the reflected blue excitation light, allowing only the longer wavelengths of the fluorescence to reach the camera’s sensor.
Fluorescence is never bright in comparison to ambient light, even at night, so moving slowly and swimming close to the reef was essential for finding appropriate subjects. Since the light transmitting through the barrier filter was rather weak, I varied the camera’s ISO quite a bit, shooting most images at approximately 1/60 sec, f/5.6 and between 400 and 3200 ISO. My strobes, set on full power, were placed very near the subjects, providing as much excitation light as possible. I found out while experimenting with fluorescence photography that if an organism does not contain fluorescent proteins it will not produce any light no matter how close or powerful the strobes!
Cook and I hovered near the reef and began to gaze more closely into the shadows, distinguishing tiny organisms that we never imagined would have fluorescent pigments. I stared at the intricate polyps of a soft coral colony that radiated a faint green. Between the polyps were tiny red fragments swaying back and forth in the gentle current. Bringing my mask within centimeters of the colony, I identified the red bits as skeleton shrimp, each no longer than a few millimeters. These planktivorous amphipods looked like predatory extraterrestrials inexplicably bathed in vibrant red fluorescence.
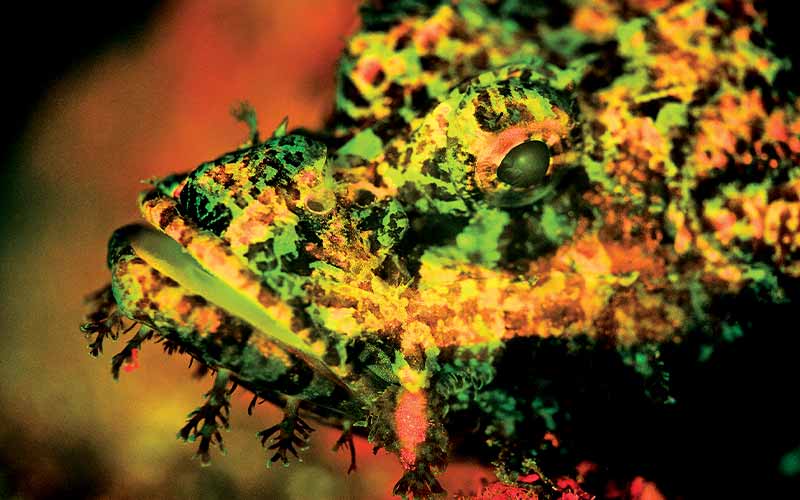
Scientists from the University of Tübingen in Germany recently speculated fluorescence in fish may be used for communication or to attract other fish. Might it also be a type of camouflage for use against predators or prey that can detect particular wavelengths of light? Whatever the case, these colors and pigments must have some time-proven evolutionary benefit since such a wide array of reef organisms produces them. Sponges, cnidarians, annelids, crustaceans, mollusks, echinoderms and even some sharks have been shown to produce fluorescent emissions. Photographing fluorescence underwater has opened a universe of unanswered questions about the advantages it confers on the variety of creatures that use it. As biologist E.O. Wilson once intimated, the more that organisms become better understood, the greater the value that will be placed upon them.
Snoots
Text and Photos by Keri Wilk
The digital era has driven image quality in underwater photography higher and higher over the past decade, so creating unique images these days often requires significant planning, dedication to a creative vision and special equipment — like snoots.
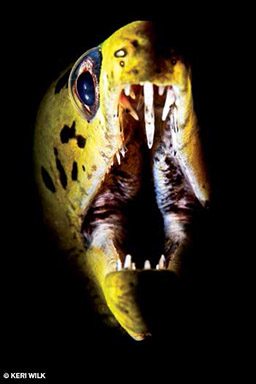
Snoots are devices used to reduce the output beam angle from light sources (strobes, torches, video lights, etc.) for more precisely targeted illumination of subjects. They’re common in studio photography but until recently have seldom been taken underwater because using them can be difficult, time-consuming and generally impractical. For those interested in creating unique underwater images, however, snoots can be invaluable aids. Underwater photo equipment manufacturers have begun to realize their potential, leading to several snoots recently becoming commercially available.
Snoot designs range from simple cylinders that physically restrict a strobe’s output to more advanced systems that use lenses to precisely focus light output on a subject (like the ReefNet SubSee Light Cannon). Flexible fiber-optic snoots also exist, primarily for use in macro photography.
Distracting elements in a scene can be removed by using a snoot to illuminate only the intended subject. This creates a spotlight effect, which can make subjects pop even if they’re in drab surroundings.
Backscatter occurs in images when strobe light illuminates particulate matter between the camera lens and the subject. Similarly, if strobe light hits the housing port or camera lens, flare can occur and ruin the image. Restricting the amount of stray strobe light emitted by using snoots greatly reduces or even eliminates these phenomena.
Light coming from snoots is more directional than typical strobe output. This characteristic can be useful for casting harsh-edged shadows over subjects, accentuating textures and contours and creating images of common subjects with unusual moods.
Snoots can be used with any type of lens — circular fisheye wide angles, midrange zooms, macros and anything in between. The method of application with each of these optics varies greatly.
Precise aim of a snooted strobe is not usually necessary when shooting general wide-angle images. I usually eyeball the strobe position, shoot, review and adjust. I’ve found that within just a few iterations the desired illumination can usually be achieved. The same technique can be used for close-focus wide-angle shots, but since subjects are usually physically smaller yet larger in the frame, strobe position is more critical. If your strobe has a modeling light that can be seen through the snoot, take full advantage of it as an aiming crutch.
Using snoots for macro and super-macro imaging can be far more difficult, frustrating and time consuming than using them with wide-angle and midrange zoom lenses. Broad, directional snooting is relatively straightforward, but creating an accurate and effective spotlight effect requires much more finesse.
Shooting moving subjects with macro spotlights is possible with strobes rigidly connected to your housing via strobe arms, but it is far easier with a cooperative buddy willing to aim them on the subject while you frame your composition. For stationary or slow-moving subjects, consider connecting your strobes via remote slave triggers (built-in on some strobes) and mounting them on small tripods (GorillaPods fitted with Ultralight Control Systems’ ball heads work well). Doing this allows you to maneuver the camera housing in any direction, distance or angle to the subject without altering the spotlight illumination.
The snoot is an effective way to change the traditional visual perception of a reef dweller while adding diversity to your portfolio and, at times, astonishing viewers.
Getting in Pole Position
Text and Photos by Alex Mustard
Although attaching a camera to the end of a pole and firing it remotely is certainly not the simplest way to produce stunning underwater images, it is an excellent option when we can’t or shouldn’t be in the water. Perhaps the subject is too aggressive or too timid, the seabed is too easily stirred up or there’s too much current. Perhaps access is restricted, as at a wildlife reserve or a swimming championship. In these situations, polecams have the potential to do that most wonderful thing in photography: create an image that would be impossible to get any other way.
Critical to successful polecamming is good equipment, which can be either purchased or custom-made. The two main components are the pole and a remote trigger for firing the shutter. There is nothing complex about the pole’s design, although one that breaks into sections is best for travel. You need an adjustable angle between the pole and camera to account for different situations and, ideally, a means to mount the housing either horizontally or vertically. Remember there is no need for the camera to be the right-side-up, and it is often easiest to mount the pole to the threaded base of the housing. This setup also benefits the strobes, which typically mount onto the top of housings and so remain underwater.
Firing the camera may be either mechanical or electronic. Mechanical is simplest, and the most basic device is a piece of string attached to the shutter control, sometimes activated with a lever from a bicycle brake. Electronic shutter releases cost a bit more but are very reliable and best if you want to use the technique frequently. You will want to mount the release to the pole so it can be triggered with a single finger, as your hands will be fully occupied with the weight of the system and the motion of the subject.
monitor is not strictly essential but can be useful for viewing your results or for seeing what the camera sees (or both). Some photographers rig a monitor to a small video camera that peers through the camera’s viewfinder. Others attach the monitor to the high-definition multimedia interface (HDMI) output and run the camera in live-view mode, seeing both what the camera sees and then, after each photo, the result. Alternatively, to avoid the shutter lag of live-view, you can use this system just for reviewing shots, aiming the pole by sight and then confirming focus and exposure.
Shooting techniques are pretty straightforward, just be sure to take plenty of frames. Aiming without a monitor is actually very easy using a wide-angle lens. If the subject is completely underwater then autofocus copes well. If the subject is right at the surface I prefer to use a manual (fixed) focus because bubbles and the surface itself create challenges for autofocus. An automatic exposure mode is usually best, as this precludes having to repeatedly lift the housing out of the water to change settings. I favor aperture priority when using strobes and shutter priority for available light shots. Strobes are often not needed so close to the surface.
To enhance comfort, as digital single-lens reflex (DSLR) cameras are quite heavy in aluminum housings, I add floats to my housing when polecamming, usually aiming for positive buoyancy and horizontal trim. Smaller compact cameras and new mirrorless systems weigh much less, which really counts when you’re holding a pole for a long time.
The final ingredient in successful polecamming is luck. The technique requires a subject that is willing to come close to the camera repeatedly, and as it can rely on spray-and-pray, we want many attempts. But having the right gear improves the odds enormously.
Lightroom 3 for the Underwater Photographer
By Doug and Lorenza Sloss

For photographers who would rather spend more time taking pictures and less time struggling with tedious image-processing software, Adobe Lightroom has been nothing short of a workflow miracle.
Elegantly showcasing Lightroom’s power and the subtle enhancements it offers, the DVD Lightroom 3 for the Underwater Photographer by Doug and Lorenza Sloss is a must-have resource. The Sloss’ insights will help you better manage your archive, master Lightroom’s many assets and enhance your efficiency and creative control. The DVD is organized into 10 hours of video tutorials grouped by six major themes (Catalog, Library, Develop, Export, Photoshop/Photomatix Integration and Slideshow/Print/Web), so you can learn precisely what you want to know at your own pace, according to your own priorities. Lightroom 3 for the Underwater Photographer is beautifully produced and illustrated with brilliant underwater images.
© Alert Diver — Q1 Winter 2012